Skin-on-Frame Kayak - September 2014
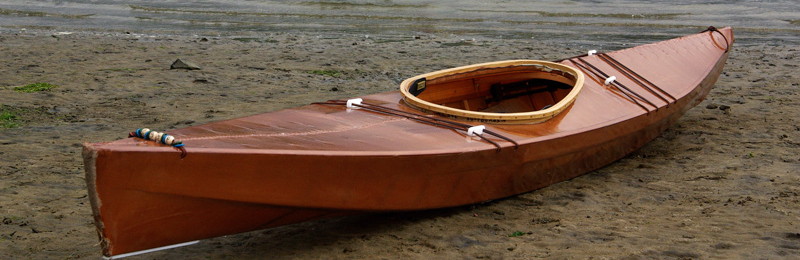
The Cape Falcon F1 - This is photo of a class made F1 and what I hope mine will look like when it's finished.
 My latest photos.
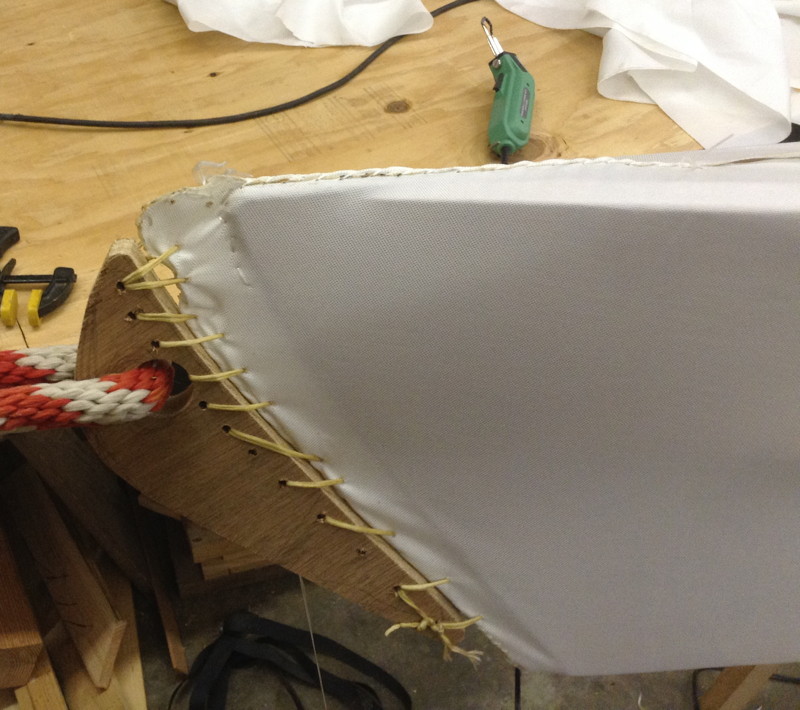
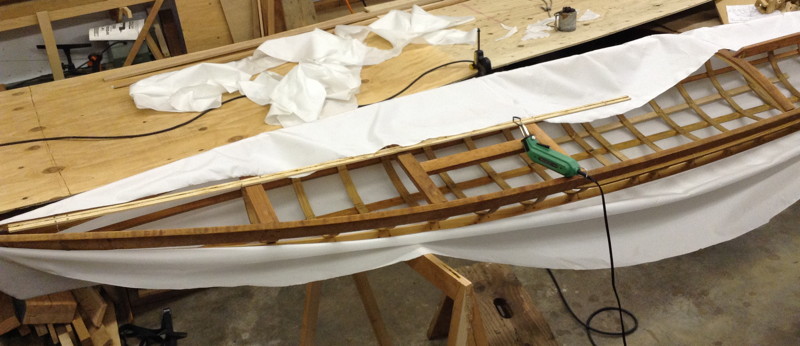
With my arthritis, I don't have enough strength in my hands to pull the skin tight enough. So, I employed a come-a-long to stretch it a little more.
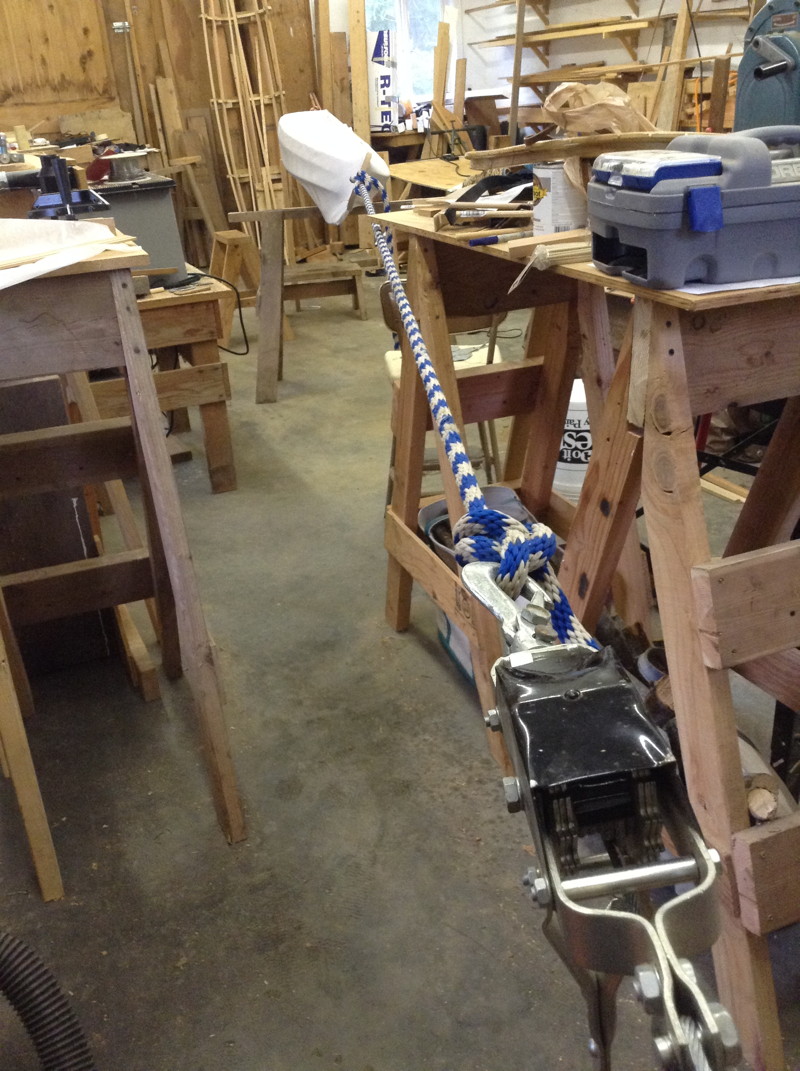
I made a shoe to lace the skin to and to attach the pull rope.
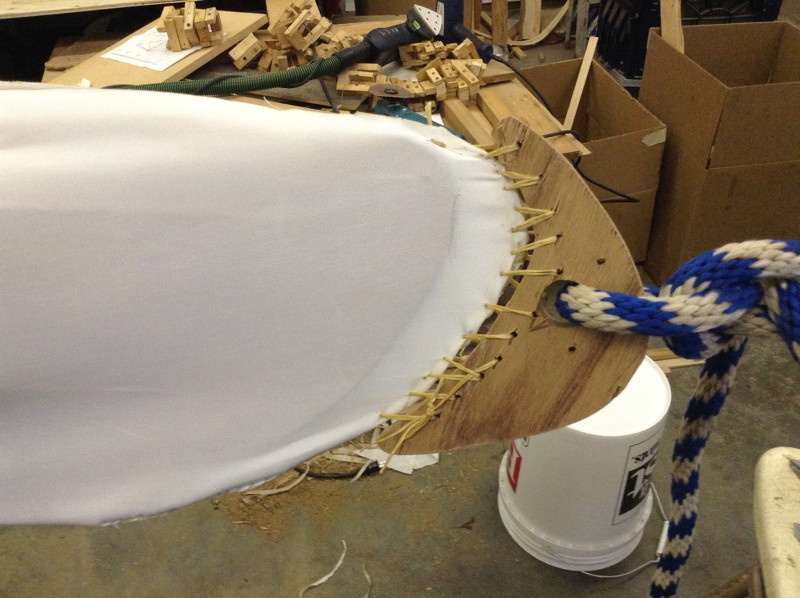
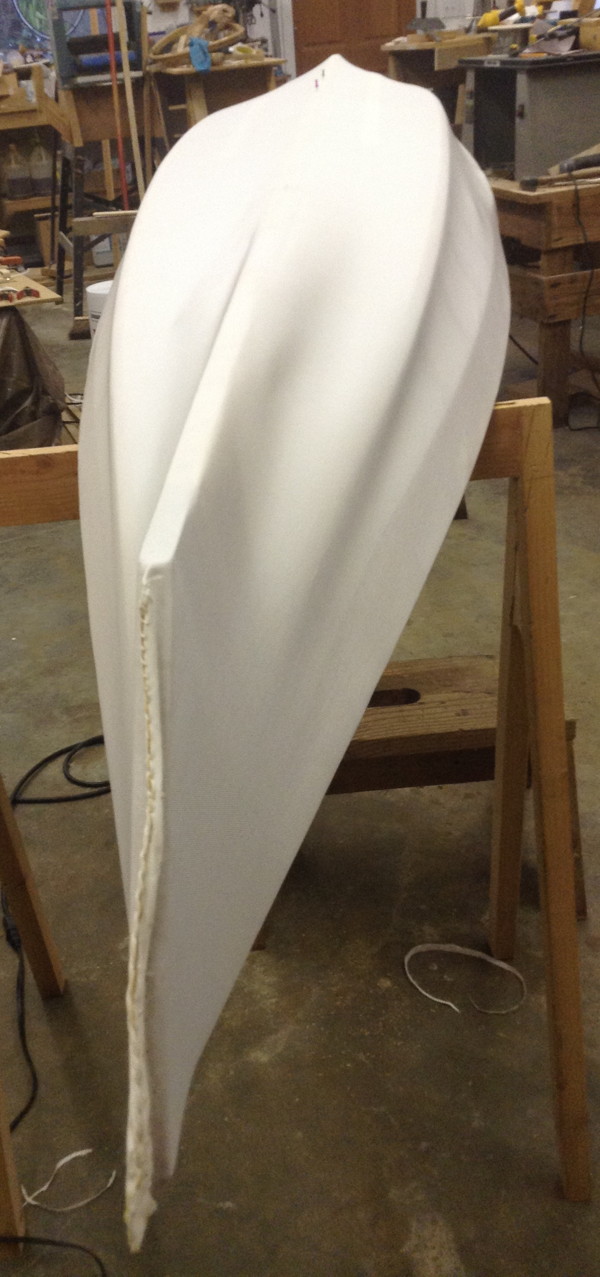
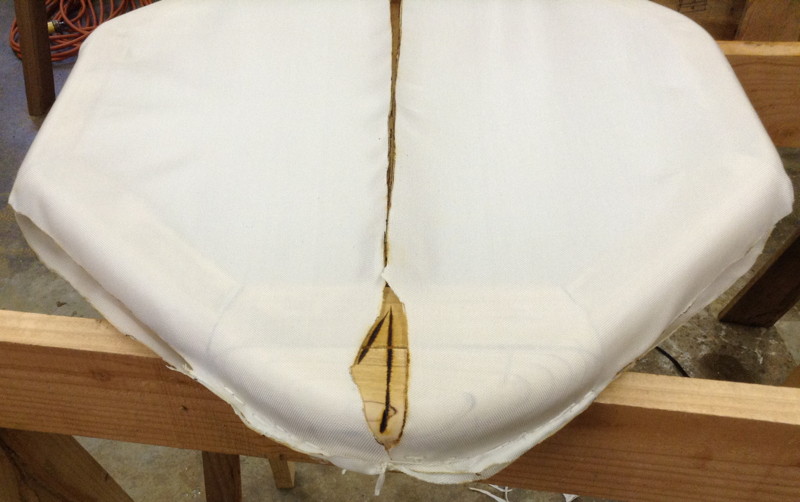
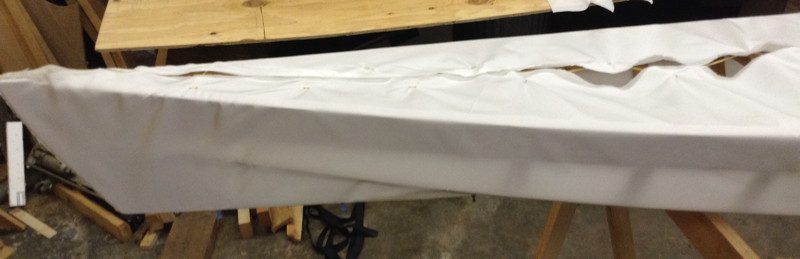
At the stern the skin was pulling off the frame at the top.
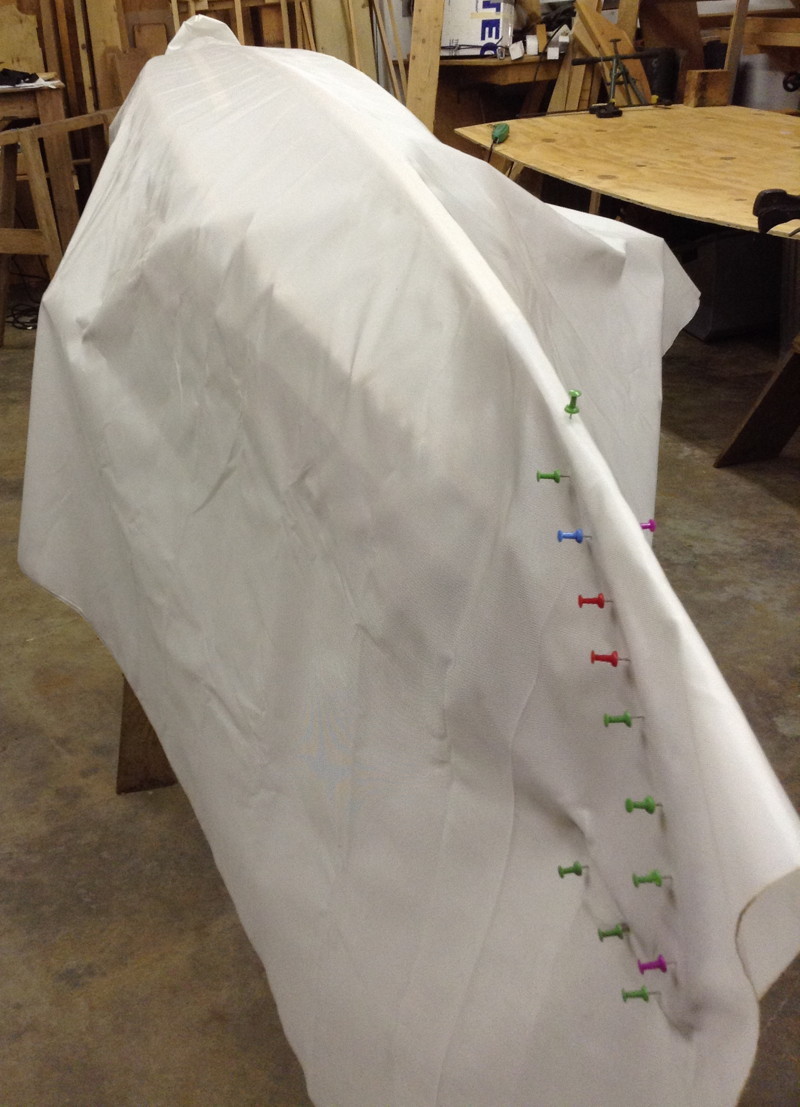
This is the start of sewing in a new pocket on the stern, using whip stitch on the keel, switching to running stitch where I'll need to cut material off. I did the same with the bow.
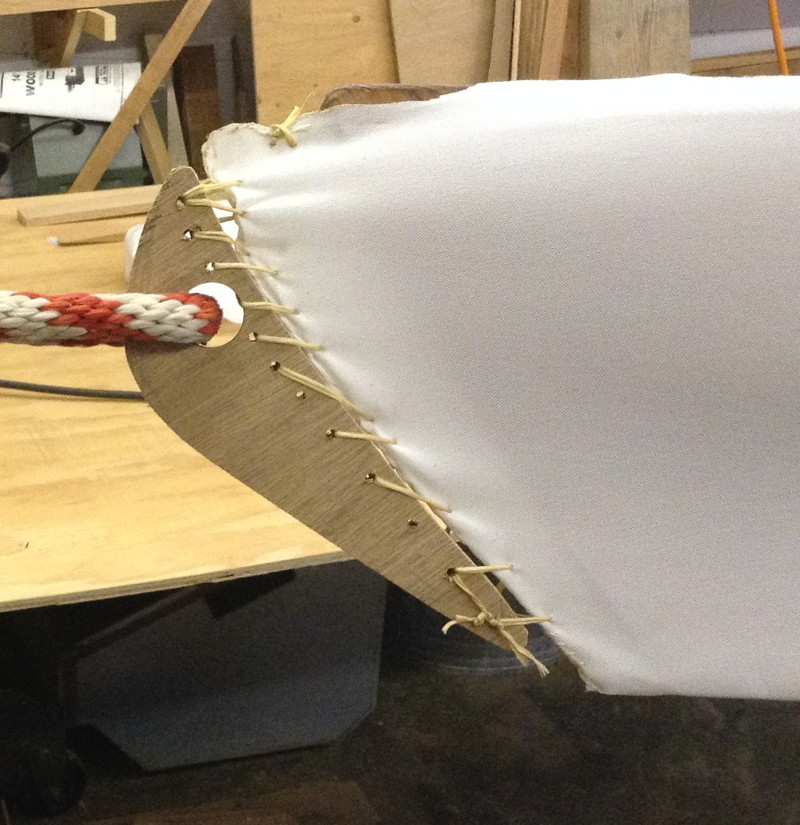
The stem with the shoe removed.
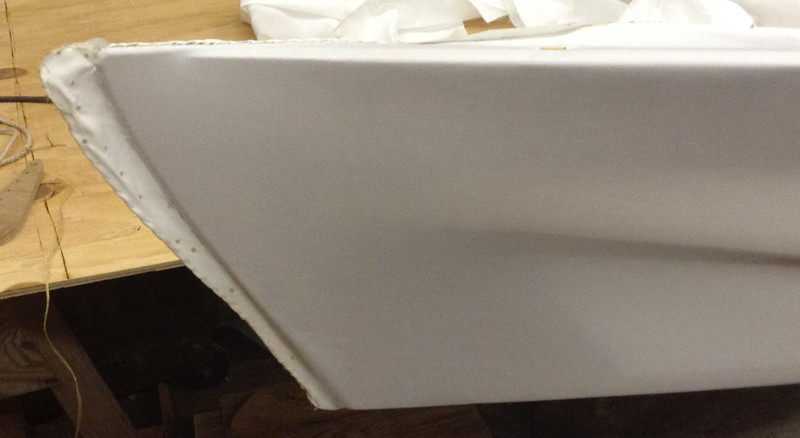
I did the same with the bow. The excess skin will be trimmed and a whip stitch done over the running stitches after I roll the hull over.
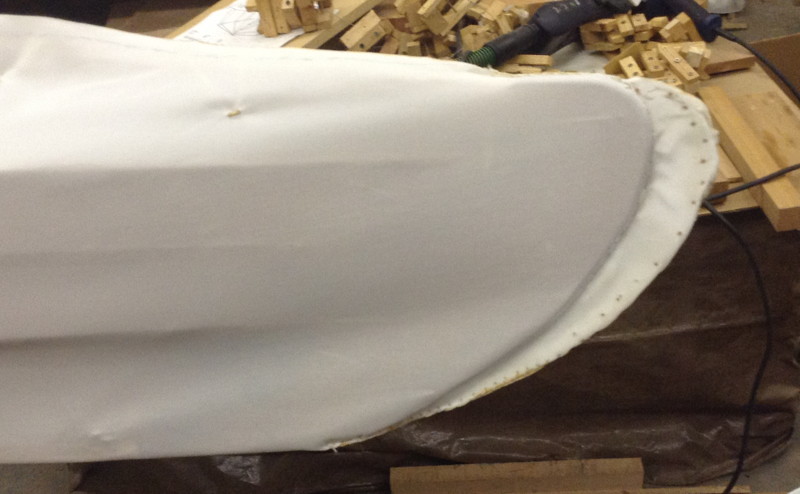
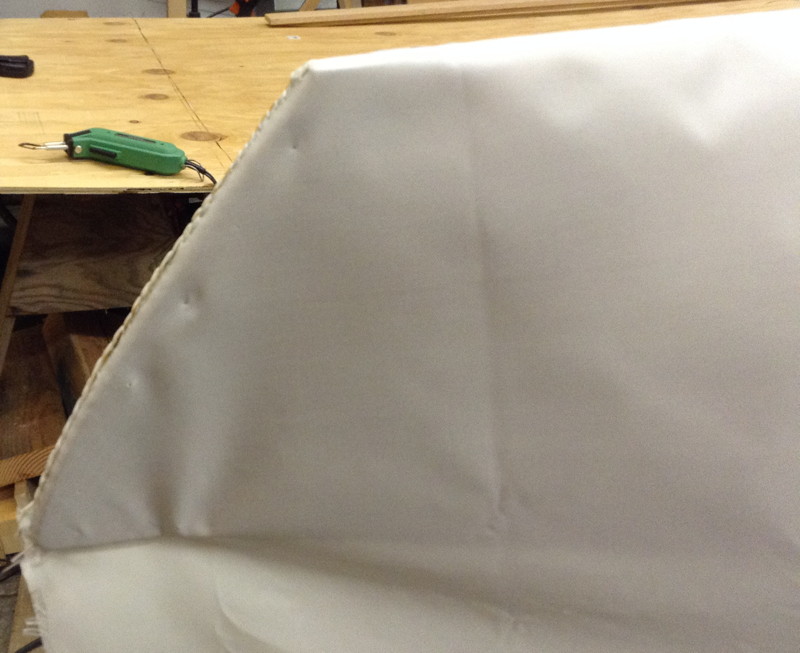
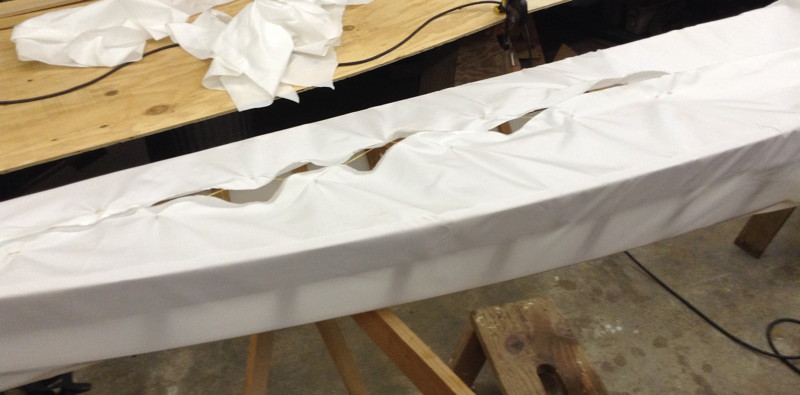
The hollows in the lines now really show.
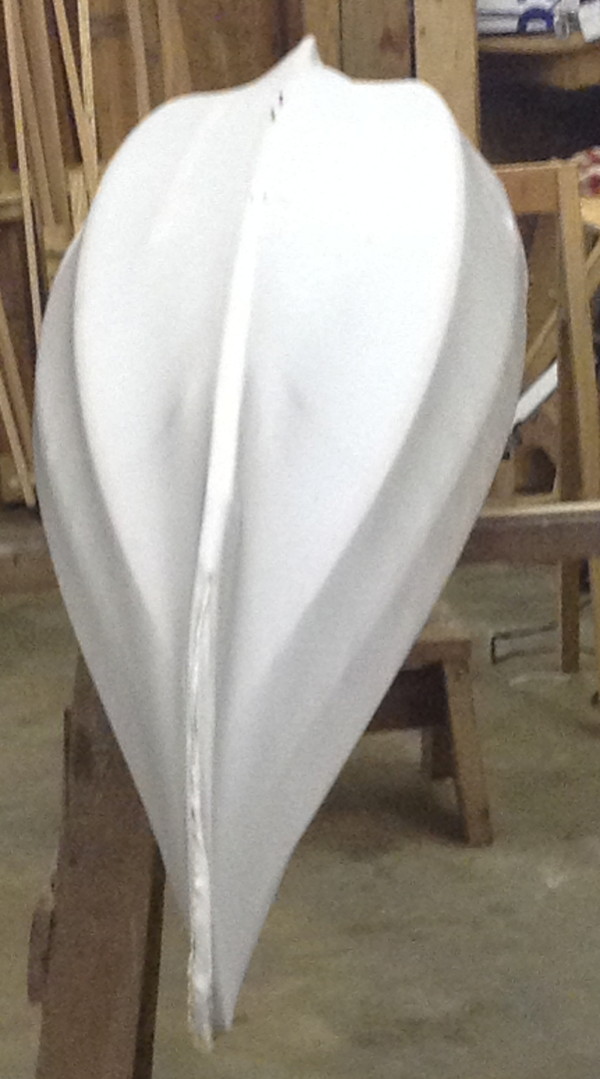
The new view from the stern.
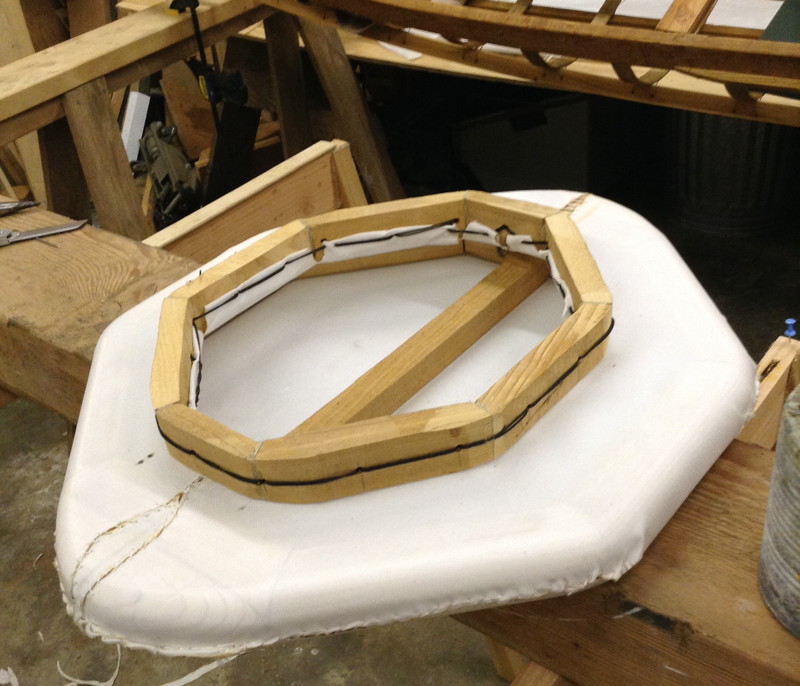
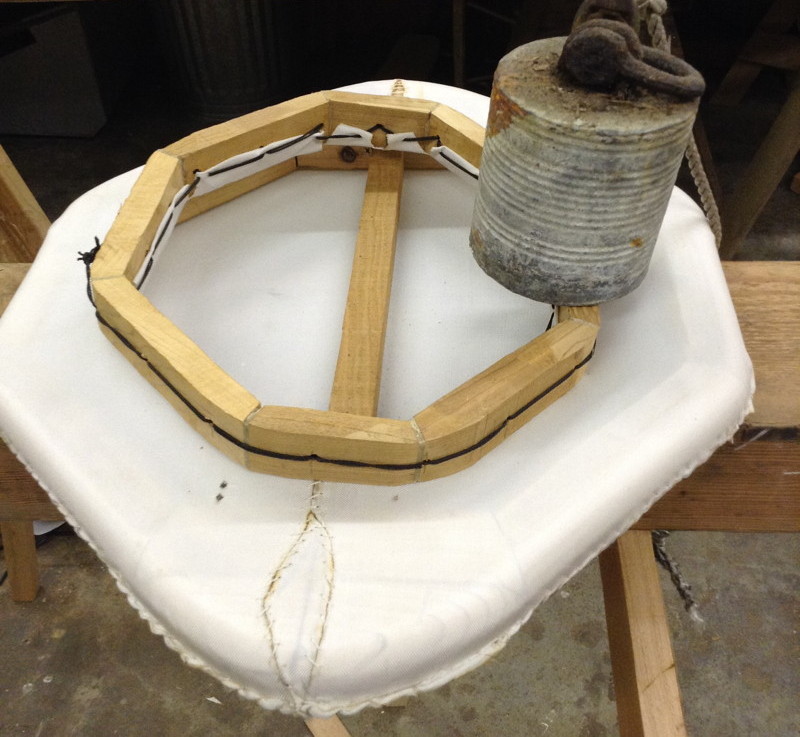
Coaming.
Ribs, which serve to hold the shape of the stringers.
Lashings, which tie the stringers to the ribs, and stems.
Foot Braces.
Making the paddle.
Sewing on the skin.
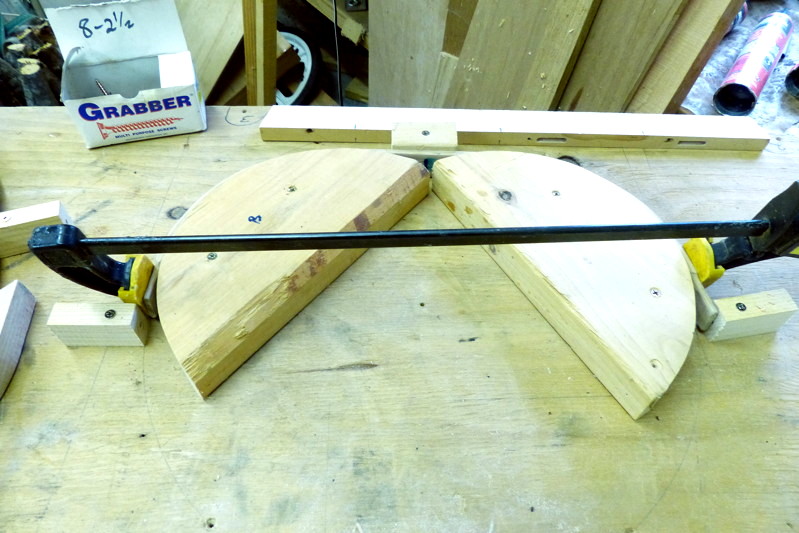
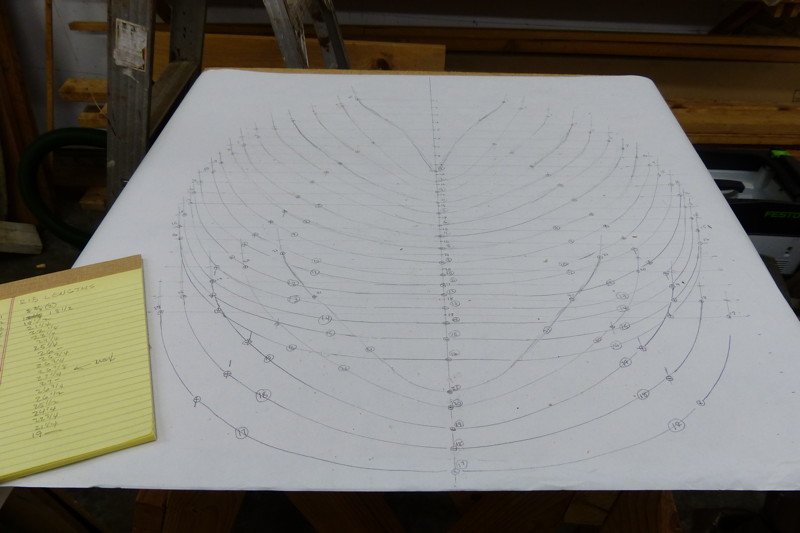 I made my rib mortices using a table router. I later discovered the router bit was undersized and they all had to be widened by hand. I blew up the sketch on my printer to make a mold for the coaming, which did work well.
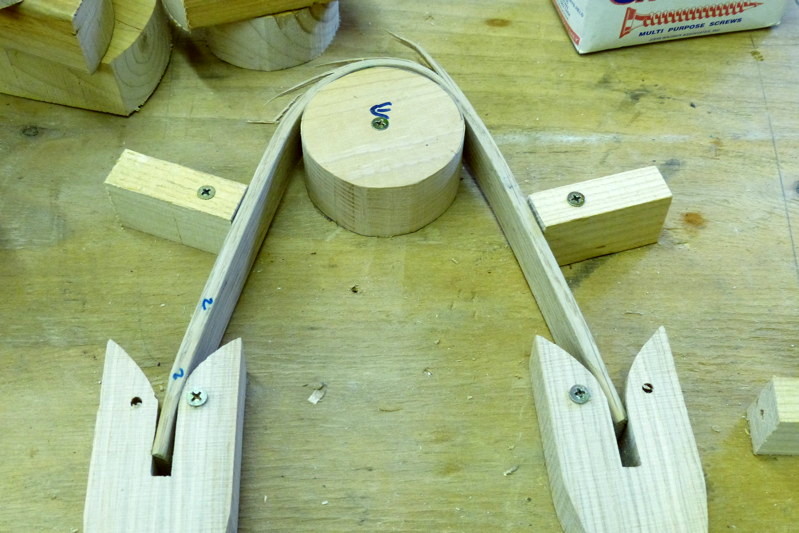
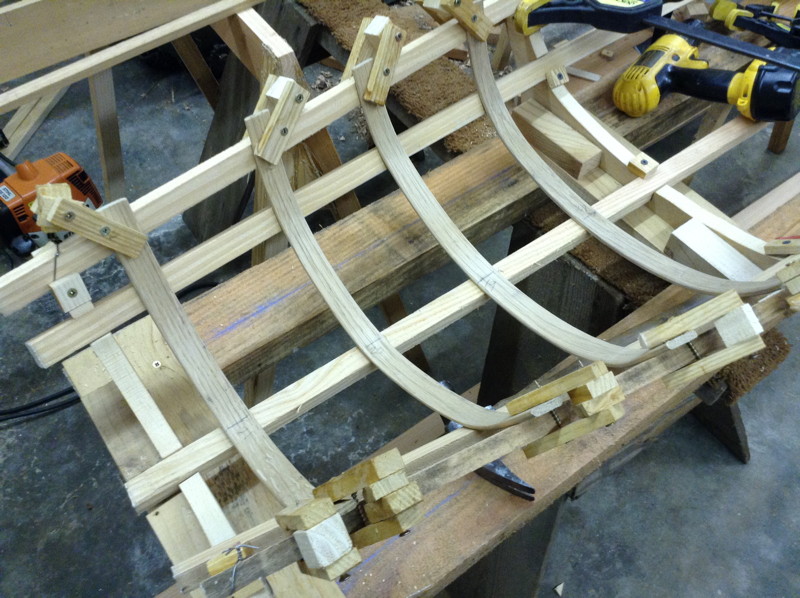
 Bending jig setup. This was my attempt to make three bends quickly. The bend was just too tight for that thickness, so I had to slim that part of the rib down some.
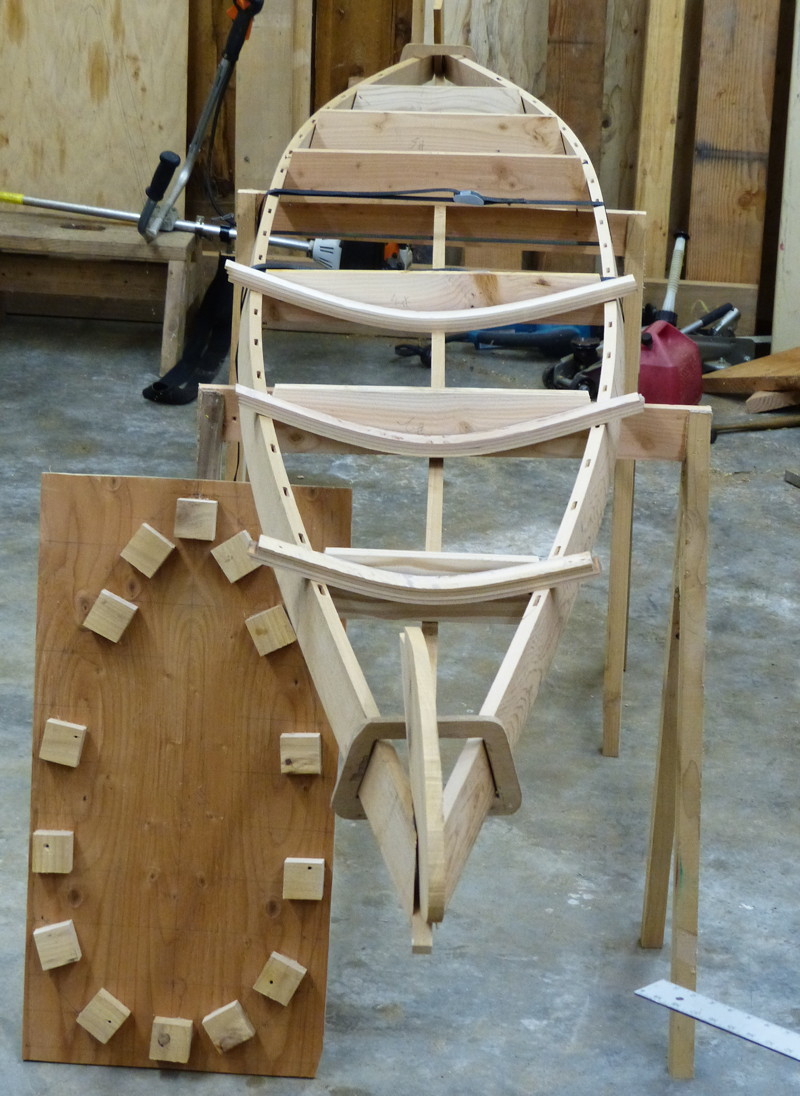
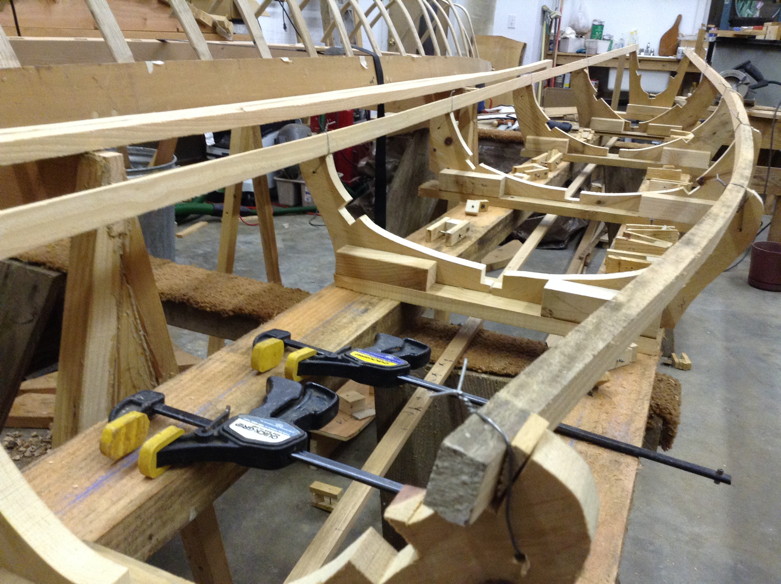
 Finished all 20 ribs and set in the mortices. None seem to fit with the stringers however. I've come to think getting the right bend on each rib is an art form.
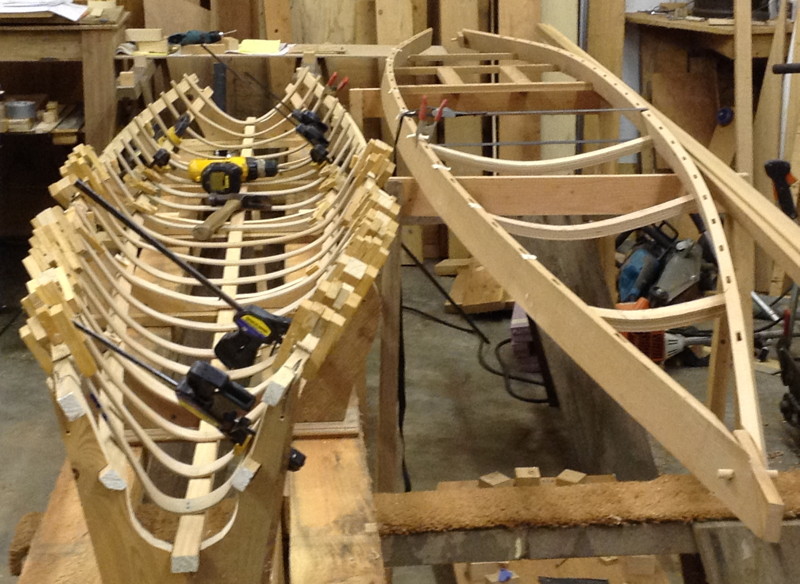
 Having such poor results bending free hand, I built a traditional rib bending process, shown on the left in the photo. These stringers are fir to take the loading of me bending and clamping the ribs inside them. The biggest advantage of this for me was being able to cut the ends of the ribs off after they were bent. Otherwise it's impossible to get the right bend unless you start with the exact right length and unless you are taking the class, it's not known.
 I couldn't be more pleased with how this worked for me. I had to do half a dozen of them over but I learned a lot in the process and feel much more comfortable with steaming now.
 But, I discovered a flaw in the process which produced faulty leg angles. All will have to be redone as explained in the building log.
 I had to replace the first three ribs, but got four of them flat on the top board at an angle that I hope will insure they fit into the gunwale mortices.
 All the ribs have been redone now, hopefully the last time.
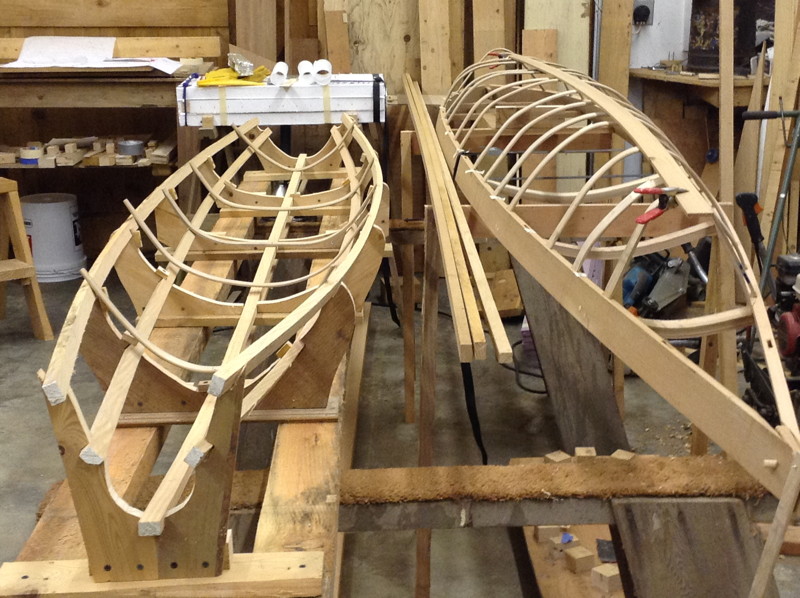
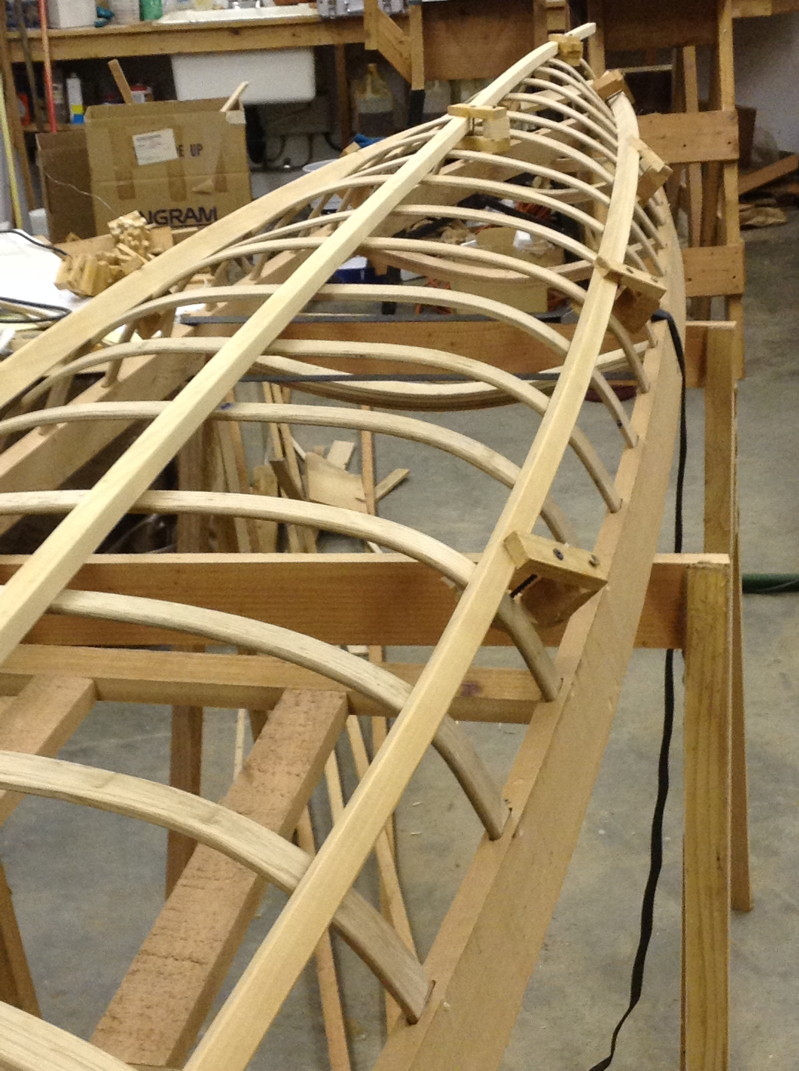
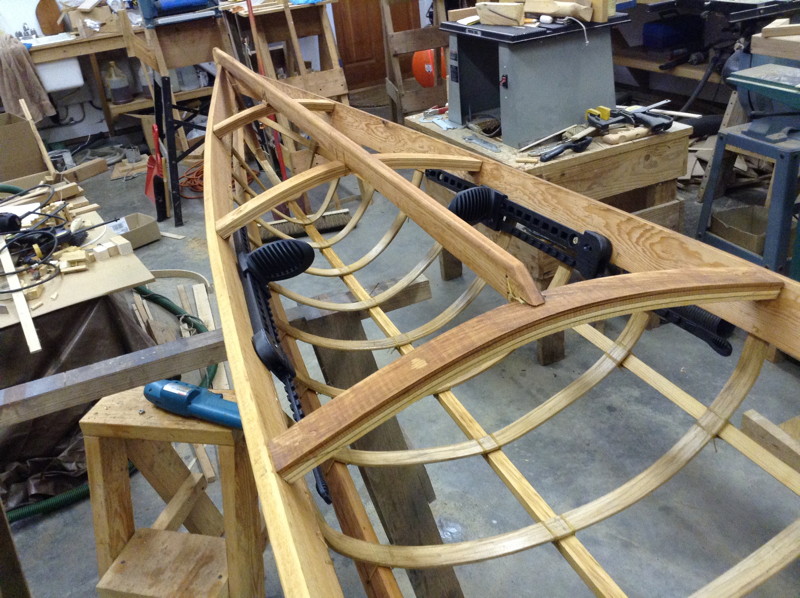
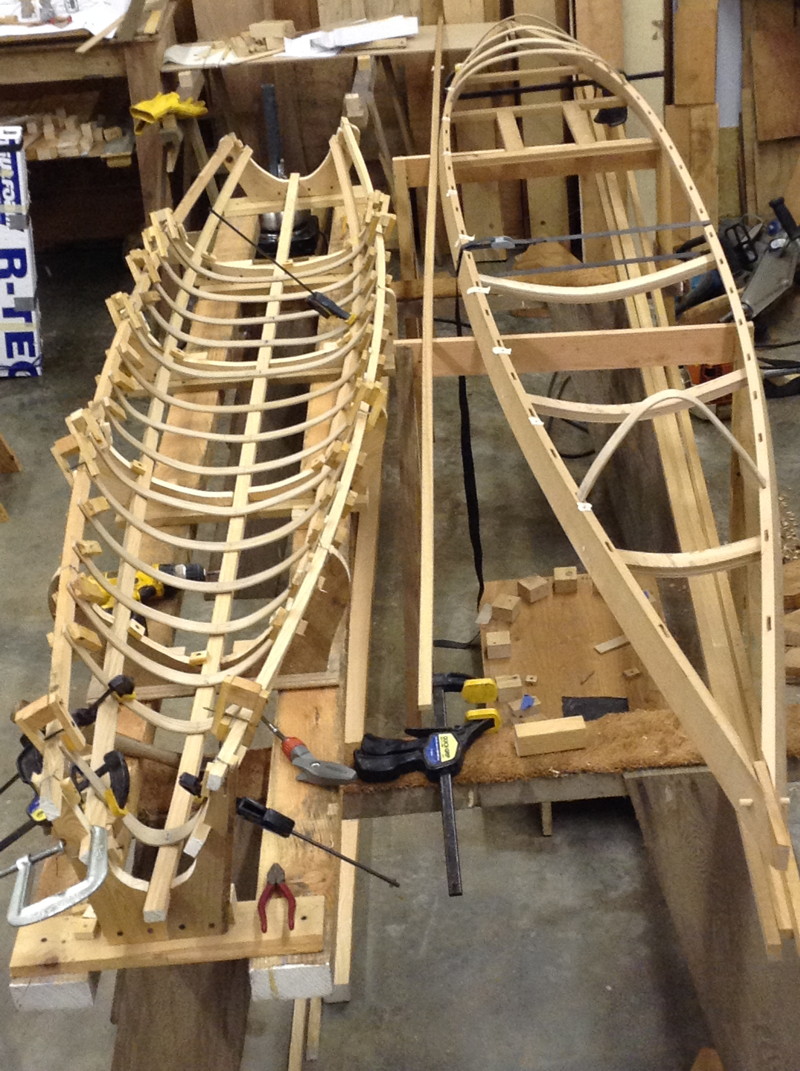 Fitting the ribs and installing the stringers seemed easy and they fit better that I had expected. View from bow end.
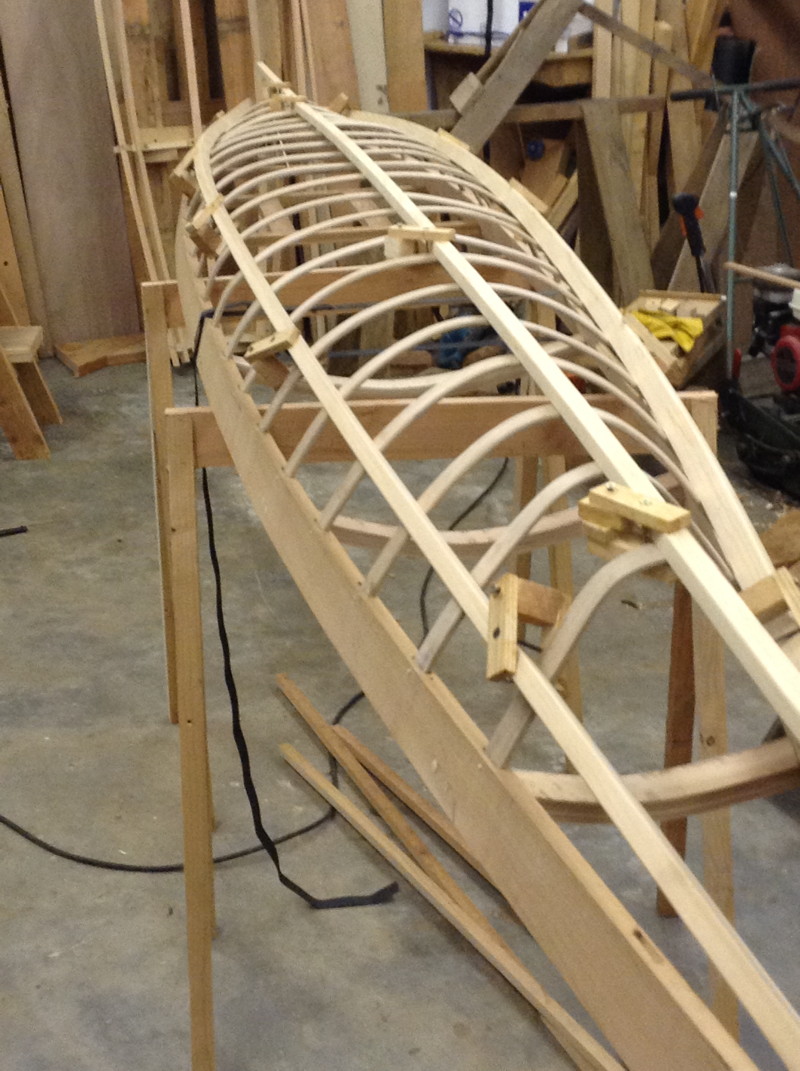 View from stern.
back to Photo Index
back to Photo Index
back to Photo Index

back to Photo Index
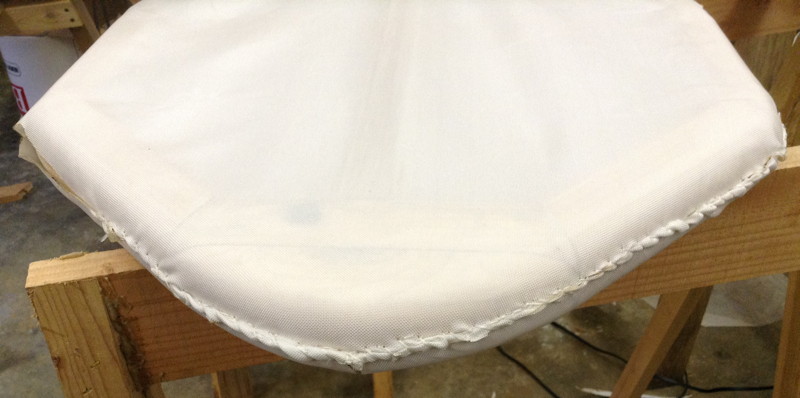
This is the bottom side of the first hoop. The end pockets were first made and one end partially sewn using whip stitch. The nylon is tight, but I've had trouble trimming it with the hot knife.
This shows my wandering cuts on the top edges.
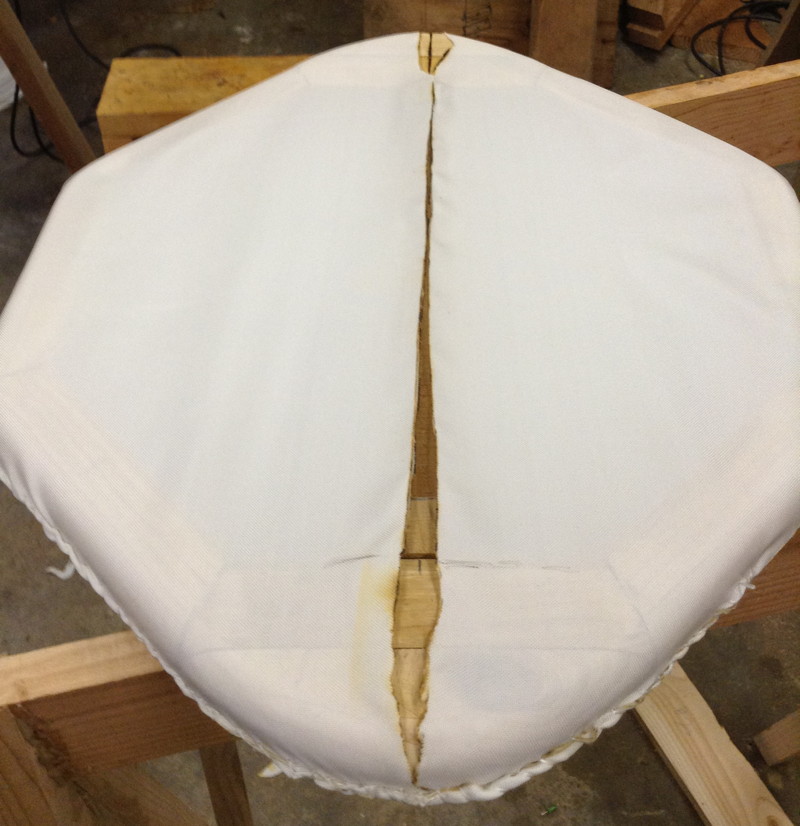
This end is even worse and although I can pull the sides together some, I'll probably need a patch here. (I'm glad I decided to practice some first before doing the actual kayak.)
 My practice coaming is sewn to the deck skin and otherwise the only points supported are forward and aft, just as the real coaming is supported in the kayak. I was curious to see how hard it would be to patch an area in the nylon. So, I cut out material for a patch and sewed it in without any wrinkles. It's possible to stretch nylon across gaps if they are not too big. There are limits however, as the gap on the far side shows.
 I wanted to see how stiff the coaming would be supported by the nylon. It flexes quite a bit but no permanent stretch. The weight is 20 lbs and is totally supported by the nylon. I learned from this test not to cut the darts too near the tie holes as with this test, only about half the ties are carrying load. I tried making the zig-zag stitch with seine twine as the two dots on the front left show. I was barely able to stitch through with size #12 twine and also there is not enough room to stitch from the underside on this size model. More comments in log.
 On the actual frame, I sewed the aft pocket first. The nylon was then slipped forward a few inches and the bow sewn. Then the skin was stretched enough to pull this end back on.
 The bow pocket was pinned and stitched, the keel pinned and the whole thing rolled right side up. The next step is to make a cutting guide strip so I can make more precise cuts on the top.
 I wired my cutting strip to the frame and it worked perfectly.
After stitching my zig zag stitches, wrinkles appeared near the stern. Happily they pull out by pulling out the slack from the pocket seam. This was sewn with a running stitch so when I sew a whip sitch over it, all these wrinkles will disappear.
Wrinkles also appeared near the center, but I'm hoping those will flatten out when I finish the stitching.
 See latest sewing photos.
back to Photo Index
Return to top Return to Index
Building Log Skip to end
9/26 - retrieved four 17 ft 1x4 cedar planks and a 12 ft cedar 2x10. Left probably from when I built my strip kayak. Milled out all the stringers and beams and ripped the forward beams into 3/16" laminations and epoxied into arches. The rear beams are flat. I finished laying out the curves to full size for each of the 21 ribs. These are normally steam bent but I discovered earlier that I can bend freshly cut cedar over a heat gun quite easily and I have an ample supply of small cedar trees and limbs on our property. 9/27 - Completed the epoxy work on the three beams and set up heat lamps to speed the cure along. Milled up the stems from the 2x10, and finished laying out the rib patterns. The longest rib will be only 27 1/2" so I can cut and mill those, running them through the planer when I am ready for them. I rigged up the planer and ran the stringers, gunwales and stems through and set up the gunwales with a centerline stick with the feet marked out. It's looking nice so far. 9/28 - Cleaned up the epoxied beams. Placed spreader sticks between the gunwales and cut bevels on the ends. Turned the gunwales to mark out the rib mortice locations so I can cut those on the router table before installing the beams. Took first photos. Discovered my smallest router bit is 7/16", I need 1/4". I also my smallest ring nails are 7/8" and I need 3/4". Need to source the leather straps and find out what weight cloth to order. 9/29 - Determined sources for all materials except the 3/8" strips of oil tanned latigo. emailed Schulz for source. Bought 1/4" router bit in Kingston and cut the mortices in the gunwales. Could not find 3/4" ring nails, but I have plenty of 7/8" ones, which I can cut down. Used hand planer and disk sander to true up my gunwale bevels. Need to determine the best artificial sinew to use for tying the frame parts together. Will have to trust skinboats.com but they suggest using their only artificial sinew for sewing thread. My next step on the frame is to start fitting and doweling the beams to the gunwales and tying so I need to get that ordered. Meanwhile, I can work on the coaming. I can also start work on a traditional paddle. My cedar 2x10 is enough for two paddles. 9/30 - Ordered all materials except the oil tanned latigo. Schulz wrote that he gets his from a tack shop. I warped coaming form with blocks and screws to put in 3/4" sag in center. Cut a piece of holly but found it impossible to bend with heat and I couldn't find a long enough piece without knots. Will try bending 1/2" cedar when I cut the ribs. Cut bevels on all the beams. They all fit well and gunwales are on the design lines. 10/1 - Fit the deck beams, and pinned to the gunwales with double 3/8" dia oak dowels. It's feeling solid now except in the coaming area where the gunwales bulge outward. I cut two ash stiffeners to go on each side of the coaming. That would give me something to attached the gunwales to and firm up the coaming. I emailed Schultz asking about adding the ash. I received notices that both my orders have been shipped. 10/2 - Schulz answered that there is no reason to support the coaming sides but that I should see an unfair flat spot in the center of the gunwales. I recut the middle aft beam longer and moved the far aft one further aft which produces the flat area and puts the gunwales closer to the H. Gordon lines. Pinned the aft beams and the two short deck longitudnals. Some thoughts for tomorrows work: I spent the last hour today in the shop cleaning up and arranging a bending station and I have the out feed table set up for the band saw, with the planer set next it so I can switch the feed end of the out feed tray from one support to the other easily. I still have to switch the dust collector hose from one to the other. After thinking about how I am going to join the two ends of the coaming, I decided to make the coaming in two layers. The top will have the lip nailed to it with bronze rib shank nails. (This is somewhat a Cape Falcon trademark I think.) The bottom has the skin sewn to the inside at about one stitch per inch, so the joining will be done whether it's two pieces or three. The bigger reason for this is that I am not sure I can even bend 1/2" cedar. Even if I use 1/2" on the lip, it still presents a problem where I join the two ends. The piece is also about 7 feet long and I'd much rather work with two 3 1/2 foot pieces and have two joints instead of one. One issue is how I will be able to handle the vertical bend in the coaming. It's only 3/4" in 31 inches, but I have to bend that on the 1 1/4" axis and I doubt very much if I can do that. So that gets me into making the strips 3/8" wider and trimming them down to fit. It seems that will be most easily done after I have the whole thing together and some temporary stitches in the stitch holes. That needs to be done before the lip goes on. The lip is only 1/2" so it should bend cold vertically with no problem. 10/3 - My Slidelock Foot Brace Kit arrived from NH today. The other good news today should have been that I had all the wood for ribs and coaming cut and planed to 1/4" and ready to rip to width, run over the jointer, heat bend and finish the ribs and coaming tomorrow. The bad news is that after dinner I picked cut rib strips from three different boards and was unable to bend any of them with heat. I presume my success before was from using a very young tree, only 2" dia, while today's tree was 8" dia and probably 30 years old. I even tried bending the layer of sap wood next to the bark and I couldn't even bend a 3/16" thickness of it. So, that's a two day setback for me at least. I don't know where Schulz gets his bamboo, but I don't see it for sale anywhere. Edensaw does list bending oak, so I'll see if I can get some tomorrow and start over. 10/4 - Bought 10 bf of bending oak from Edendsaw, a hot plate, kettle and enough foam to build a steam box. Made the box and tried bending a trial piece of 3/8" oak after it had been in the steam box for 20 minutes with temp maxing out at 191 F. It did bend but not enough and it was starting to break on the outer edges. It could not fit back into the steam box without unbending it, so I quit for the day. 10/5 - The hot plate had a puddle of water in it when I removed the pot. Attached a hose clamp around the pipe to the pot spout and wrapped a large rag over the whole joint. Cut 2" walls and ends for the steam box from yesterday's scrap, so my box is now 2" high inside. I milled up two 3/8" x 1 1/4" x 43" strips (two 43" strips allow for 4" overlap on each side of coaming) and placed in box with heat on high. Box temp came up to 201 F in 15 minutes. After 20 min soak at 205 F to 210 F I was able to easily bend and clamp the piece around the aft end (easy end) of the coaming form. After several hours I moved the clamped piece off the form and repeated for the forward end. The radius was much tighter and came out a little lopsided. It may just give the coaming some character. Started cutting ribs. 10/6 - I was in Edmonds most of the day so no work. I did clamp the two ends of the coaming together and the width came out perfect. I'll lap join the two pieces and cover the angle with the lip so it won't show. The things I ordered a week ago arrived today. I weighed the piece I cut off the end of one of the coaming pieces and dried it in the oven overnight and determined moisture in the bending wood at 20 percent. That apparently is okay for white bending oak. It's sure pretty wood and very hard and strong.
10/7 - Made up bending jigs and after a few false starts, I figured it all out and steamed the first two ribs. Since one was the shortest rib and the other was the longest one and they both came out perfectly, I am pleased. 10/8 - I steam bent two lip pieces around the coaming mold and made the lap joints on the two main coaming pieces. I had intended to join the lap joint with sinew, but I was unable to get enough tension in the sinew to keep the joint from moving excessively. I don't have the skills to use sinew to make a firm joint so I made an epoxy scarf joint test from cut off pieces of the same piece of oak I made the coaming pieces from. 10/9 - A uTube video showed me why my knots in the sinew didn't hold. My neighbor Bob gave me a sheet of 1" purple foam he had left from one of his projects and I built a smaller steam box from it. I'm hoping the smaller box will heat faster and once I know how fast, I want to try adding salt to see if that reduces the time further by reaching higher boiling temperatures. 10/10 - The epoxy test held as well as a solid piece under load, so I cut out the lap joint cuts and replaced them with scarf cuts. I also cut two new pieces to scarf in where the lap joints were. My concern is in using epoxy in a joint that is under load. The required clamping could well push all the epoxy out of the joint. 10/11 - Epoxied the coaming scarfs. 10/12 - Cleaned up the scarf joints, sanded the coaming and tried to fit the lip. While the aft half of the lip fits fine, the curve of the fore section was too sharp a bend to fit. So I cut a new lip piece and steamed it. This time I was able clamp directly to the coaming, so it's a perfect fit now. 10/13 - Nailed the lip on the coaming. The wood was so hard and the bronze so soft three nails bent over. Tried out the purple steam box redoing ribs 3 and 14. The foam warped much more than the styrofoam, so much I had to pry the door open with a large screw driver. The ribs bent easily, but I didn't get the right bends. I cut 9" off each end of the styrofoam box and was able to fit the same ribs into it. So I set up a jig which should correct the bends and I hope to make them fit tomorrow. 10/14 - I discovered that I could salvage the ribs that didn't fit right on the first try. When I put the bent test rib in, it pushed the end block out only minutes after the steam developed in the box and the rib straightened out. This will save me a lot of material compared to only using what came from the first steam attempts. I created a fitting board to test the fit of pieces as they come out of the box and are first shaped. This should allow me to make quick comparisons to other ribs so I can maintain a work flow. 10/17 - rebuilt the spout on the steamer and tested by bringing the box up to temp as measured with my new thermometer. 10/18 - Cut individual fitting boards and was able to steam a batch of six ribs with no trouble, and I know they will fit the gunwale mortices now. I want to add ribs at both ends so I devised guide blocks attached to the router base. It worked perfectly but I centered it on the base and the collet is off center about 1/8" so I'll have to do it over. 10/19 - I marked up the jig board for the remaining ribs. This lets me screw in the blocks just following the numbers on the board so it's very fast. Corrected the router blocks and cut the remaining mortices. 10//20 - Steamed the remaining 7 ribs. I made a new tool from plywood that has a slot for the ribs so I can bend and twist the ends to fit into the slots in the fitting boards. Otherwise the stress seemed too much for the soft cedar mortices on the end ribs where the mortice angles are larger. 10/23 - Placed the keelson on top of the ribs. Several ribs were within 1/4" or so, all high and few if any it appeared could be made to fit by just trimming off the ends. Tried to figure out the flaw in my first approach and made several tries with no success. Finally decided to try cutting molds to hold mock stringers and re-steaming the ribs to bending inside the stringers using the conventional method of bending ribs. 10/24 - Blew up the H. Golden lines sections to full size on the printer. Rearranged the shop to have clear space to try new rib bending process. Milled jig stringers from fir, replaced end blocks in the steam box, and set up strong back rails on heavy sawhorses. 10/25 - Made and installed bending frames at the even feet from 2 to 12 feet and placed the heavier fir stringers. I pulled the the ribs that fit best from the gunwales to see how they fit in the rib bending jig and I'm satisfied. The jig seems strong enough without added bracing, but I'll have to bend some to be sure. 10/26 - Re-steamed all the ribs and they are all on correct lines now and I know exactly how much to trim off them before inserting them back into the gunwale slots. 10/27 - Correct lines don't mean correct leg fits however. Although I had perfect bends in all the ribs at the stringers, none of the leg angles were right and the amount of correction was too great for anything but resteaming. I was flabbergasted that this could happen and only after figuring the trigonometry did I realize that while H. Golden's drawing reflected the 1/2" square knuckle, it was not included in the section drawings I had copied my jig angles from. (I later discovered Golden was correct and it was my own mistake. - 11/1 below) I thought it would be simpler to cut off a wedge on the outside of each leg and epoxy it on to the inside to fix the fit. Tried that with ribs 20 and 21 and found that didn't work because the legs were not long enough. On further study of the drawing, I realized I could just add a 15 degree wedge behind each of the top stringers rather than having to disassemble. It appears that many of the ribs will now be too short. 10/28 - I steamed four ribs, three of them new ones, and got them clamped with the right leg angles I think. I'm going to check these first before steaming any more. 10/29 - Yesterday's ribs fit fine. Replaced side walls on steam box and patched with duct tape. One of the remaining 16 ribs fit okay so I re-steam bent the other 15 and it seemed to go well. 10/30 - The ribs fit better but still tight due to the undersized router bit I bought. But, I found a Dremel Tool bit, slightly smaller than 1/4" and tapered, does a wonderful job of trimming the high spots. 10/31 - Finished fitting the ribs and locked them in with bamboo skewers as dowels. I cut a new keel as I found a better piece of cedar. sanded down the keel and chine stringers and clamped them on the ribs. They seem to fit beautifully. 11/1 - I discovered my biggest mistake yet! I knew originally that the gunwale angle was 25 degrees off vertical but in setting the first angle I accidentally added 5 degrees to the 70 degree mark instead of subtracting it. After that, 15 degrees just looked right to me. The Golden drawing is correct, and my ribs should have fit right the first time. The flare angle totally controls the rocker in this design, so it had to be right if I ever expected the kayak to turn in the water as it's supposed to. I was able to extract my dowels and recut the beam angles with the ribs and clamped on stringers holding everything in place. 11/2 - Even with the beam end angles recut to 25 degrees, and the dowels only inserted lightly, the best I could get was 20 degrees from the gunwales. Starting with the tightest rib I had to remove 8 of them before achieving 25 degrees on both gunwales. Clamping the joints, I began installing diagonal dowels to lock in the angle. 11/3 - Finished the diagonal doweling. I can see the increase in rocker the correct flare produces. After re-pinned the ribs however, some of the angle was reduced. So, I started again with the tightest ribs and adjusted the mortices to loosen up the fit on those ribs, bringing the frame back to the 4 1/4" rocker indicated on Golden's shear line. 11/8 - Recut stern gunwales with correct flare to stem fit. 11/9 - Recut bow gunwales to stem fit. 11/10 - Attached stems to gunwales temporarily with screws. I'll replace those with dowels once I fit the keel to the stems from the bottom. 11/12 - Put radiuses on the gunwales with a Slickplane and sand paper. It's quicker and less messy than using the router. Tried to lash the top stringer to the forward beams, but was unable to master the technique in getting the lashing tight. I finally just gave up. 11/14 - After two attempts using tarred marlin, I made a good enough lashing on the top stringer. I tried the technique I used with marlin using double sinew, and the results appear passable. 11/15 - Built a jig to test my sinew joints against an epoxy one for comparison plus variations in the sinew joints. Cut a new rear stem, and moved the second from aft rib in the coaming forward 3". 11/16 - Epoxy joint supported 124 pound inches of moment before breaking out part of cedar where epoxy had penetrated. Double strand sinew joint held 59 lb in, before compressing wood and stretching sinew. Joint returned 90% when load removed. Wood compression was permanent. See no advantage in more than double strand. 11/17 - Completed 15 sinew joints on the keel, 7 more to go. 11/18 & 19 - Completed lashing the keel and the first chine. 11/20 & 21 - Realigned the chines and stems. Lashed the aft stem and gunwales. Cut the knuckles. 11/22-24 - Lashed the other chine and knuckles, coated with 2 coats of tung oil mix, and 2 coats of varnish on the coaming. Installed the foot braces. Printed out the drawing for the paddle and measured out my 2 x 8 cedar board. It's 7' - 6" long, or enough for two paddles. 11/25 - The shop cools to mid 50s at night so the varnish doesn't dry overnight. Measured off and made the first four cuts on my first Greenland paddle. 11/28 - Finished the paddle and coated it with tung oil mix. I've studied Schulz's method for skinning the kayak and theoretically all I need now are more push pins. I'm not really sure I'm ready however, so the engineer in me it toying with the idea of constructing a test frame and coaming and using the excess skin and poly coating, and have a trial run with that first. 12/2 - Tried sitting in frame on floor. Needs slats between ribs for my heels. 12/4 - Milled two 60" slats. Tested sinew single knots. 12/8 - Lashed the slats and sat on foam cushion. The seating seems fine, but 1 1/2" of the toes on my size 13 shoes would stick through the upper skin. The skin is below the slat, so it means I either wear socks, or make small domes in the skin for my toes. 12/9 - Placed ply where skin will go on deck over feet and assumed paddling position. It's a tight fit getting in but my calves and hamstrings felt fine after 20 minutes with pressure on the pegs. ----- 2015 ----- (Spent Christmas in California) 1/16 - Made up test hoops for practicing sewing. Also bought leather straps for deck lines. The dental floss I bought was too thin and I don't want to use waxed, so still looking for that. 1/17 - I purchased thicker dental floss, made up toggles for the deck lines and cut radiuses on the hoops. I still need to locate seine twine to sew zig zags and coaming. 1/22 - Made my first attempt at sewing. Luckily I started sewing on practice hoops to get the hang of it. The callouses on my fingers kept catching on the floss, like tiny fish hooks. I was forced to stop and carefully smooth off the rough places on my fingers with 220 grit sandpaper before being able to continue. After sewing in the end pockets and making a whip stitch on most of one end, I tried to do the zig-zag stitch. I was unable to find #9 seine twine locally so bought #12, thinking it was smaller. (it's larger) I could barely get it through the eye of the curved needle, only to then find there was no way I could stitch inside the nylon, it was too tight on the hoop. Removing it left black, ugly tar spots on the nylon. I glued up a smaller practice coaming to sew in the middle of one hoop once I finish whip stitching the rest of the seams on the hoop. 1/23 - From sewing on the hoop I've learned how much I can stretch the nylon just with the stitching, that I must wait until the pockets are completely sewn before trimming the middle parts, that if I do trim too much it can be patched back in, but it's ugly. Sewed in the practice coaming. When I cut the darts for the part of the nylon that folds up inside the coaming, I forgot to stagger them with the twine holes, so only about half of them do much as a result. Other things learned; 1) Use push pins to hold fabric while using running stitch on end pockets, then trim. 2) Don't cut with cedar or fir under the nylon as a brown color bleeds into it. 3) Use something to hold nylon in place on one side while trimming excess. (push pins should work since I don't have small enough twine for zig-zags) 4) Insure that the twine holes in the cockpit are an even number so each of the two passes can be tied on the outside. 1/30 - Sewed the aft pocket and pinned the bow. 1/31 - Sewed the bow pocket, slipped the aft pocket over the aft stem and rolled the kayak right side up. 2/5 - Grooved a piece of ash for a cutting guide, wired it to the frame and trimmed the two sides. 2/6 - There were excessive wrinkles on the top side center due to lack of grip in my hands. (arthritis is a new thing to me, but at 78 years, I guess it's not uncommon.) So, I rigged up my come-a-long with shoes to connect a rope to and to sew to the end pockets. It worked great and I expect now the remaining wrinkles will flatten out when I finish the top seam. 2/7 - Repaired aft pocket which was slipping off the frame. By clamping the now excess nylon on the ends, I ran a running stitch to finish the pocket. Did the same with the bow, removed the shoes and turned the hull over to trim the ends and whip stitch over the running stitches.
My latest photos.With my arthritis, I don't have enough strength in my hands to pull the skin tight enough. So, I employed a come-a-long to stretch it a little more.
I made a shoe to lace the skin to and to attach the pull rope.
At the stern the skin was pulling off the frame at the top.
This is the start of sewing in a new pocket on the stern, using whip stitch on the keel, switching to running stitch where I'll need to cut material off. I did the same with the bow.
The stem with the shoe removed.
I did the same with the bow. The excess skin will be trimmed and a whip stitch done over the running stitches after I roll the hull over.
The hollows in the lines now really show.
The new view from the stern.
Plans for this kayak are not for sale as explained by the developer, Brian Schulz. He has made his lines drawings and class photos available for students and selected individuals who are unable to attend his classes. I've been in contact with him and he has been generous in answering my questions. The construction technique is unique, at least to me in that there is no strongback. The entire profile is governed by the bends in the gunwales, which are held at 25 degrees off vertical.
I've kept a diary of my construction process in the Building Log.
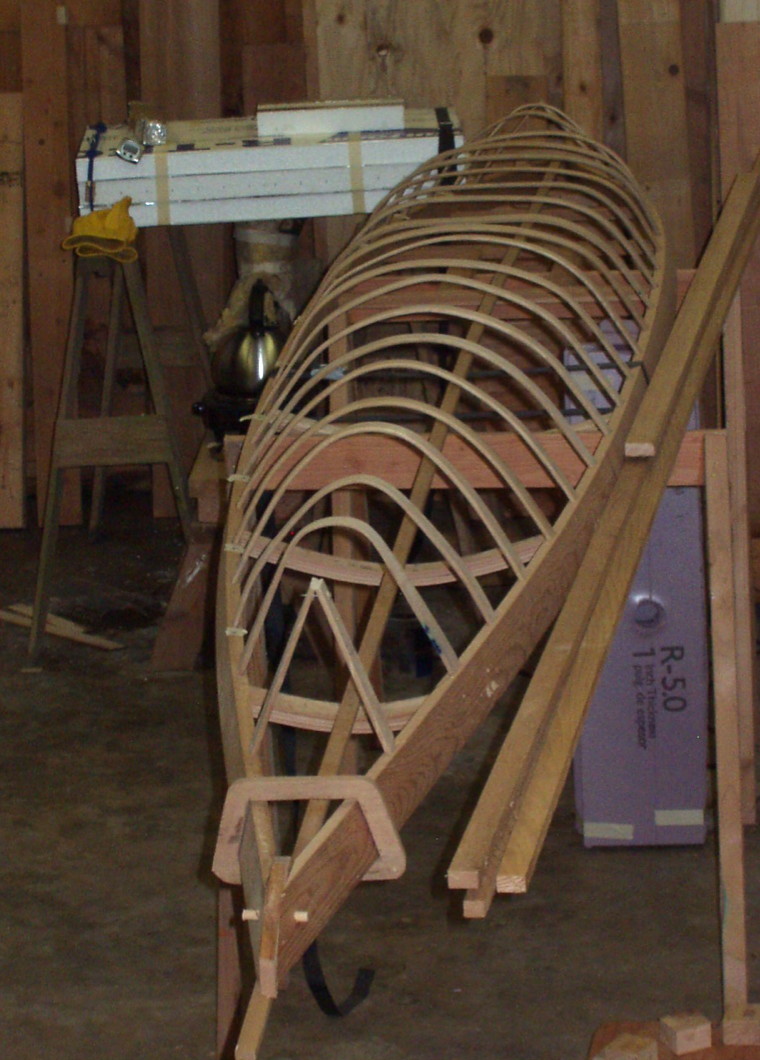
Building photos by the different building phases. Building the Frame, which includes the gunwales, cross beams, stems, chines keel and top stringer which runs from the coaming to the bow stem.
Coaming.
Ribs, which serve to hold the shape of the stringers.
Lashings, which tie the stringers to the ribs, and stems.
Foot Braces.
Making the paddle.
Sewing on the skin.
Ribs.
I plotted out the ribs full size to determine the lengths and bends. I found out later that the accuracy in which rib lengths can be determined from this approach is not accurate enough to get the ribs to fit.
I made my rib mortices using a table router. I later discovered the router bit was undersized and they all had to be widened by hand. I blew up the sketch on my printer to make a mold for the coaming, which did work well.
Bending jig setup. This was my attempt to make three bends quickly. The bend was just too tight for that thickness, so I had to slim that part of the rib down some.This was a learning process. While I had close to the correct length for the rib, I failed to get it centered and the stop block missed the end. This rib probably made six trips through the steam box before it finally fit.
This jig with the levers was closer to getting an acceptable fit but not close enough.
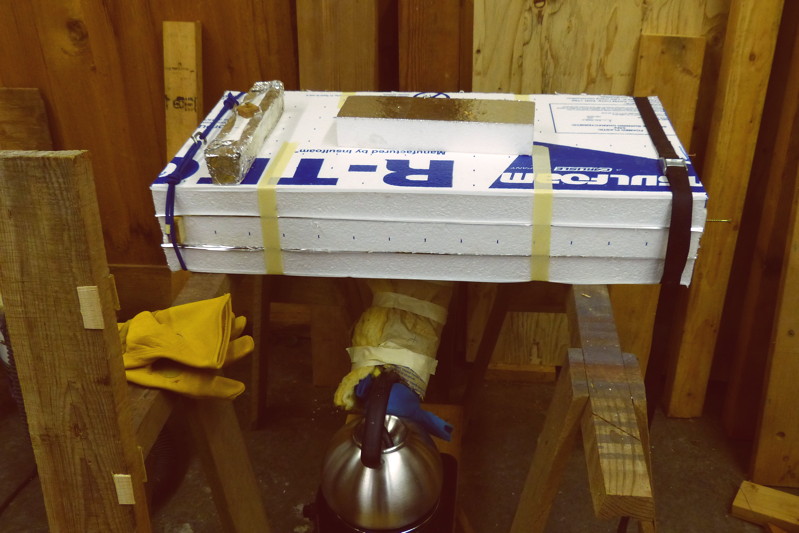
Since the ribs are shorter than the coaming pieces I was able to reduce the size of the steam box once the coaming was finished. The smaller size takes less steam and time to reach and maintain bending temperature.
Finished all 20 ribs and set in the mortices. None seem to fit with the stringers however. I've come to think getting the right bend on each rib is an art form.
Having such poor results bending free hand, I built a traditional rib bending process, shown on the left in the photo. These stringers are fir to take the loading of me bending and clamping the ribs inside them. The biggest advantage of this for me was being able to cut the ends of the ribs off after they were bent. Otherwise it's impossible to get the right bend unless you start with the exact right length and unless you are taking the class, it's not known.
I couldn't be more pleased with how this worked for me. I had to do half a dozen of them over but I learned a lot in the process and feel much more comfortable with steaming now.
But, I discovered a flaw in the process which produced faulty leg angles. All will have to be redone as explained in the building log.
I had to replace the first three ribs, but got four of them flat on the top board at an angle that I hope will insure they fit into the gunwale mortices.
All the ribs have been redone now, hopefully the last time.
Fitting the ribs and installing the stringers seemed easy and they fit better that I had expected. View from bow end.
View from stern.
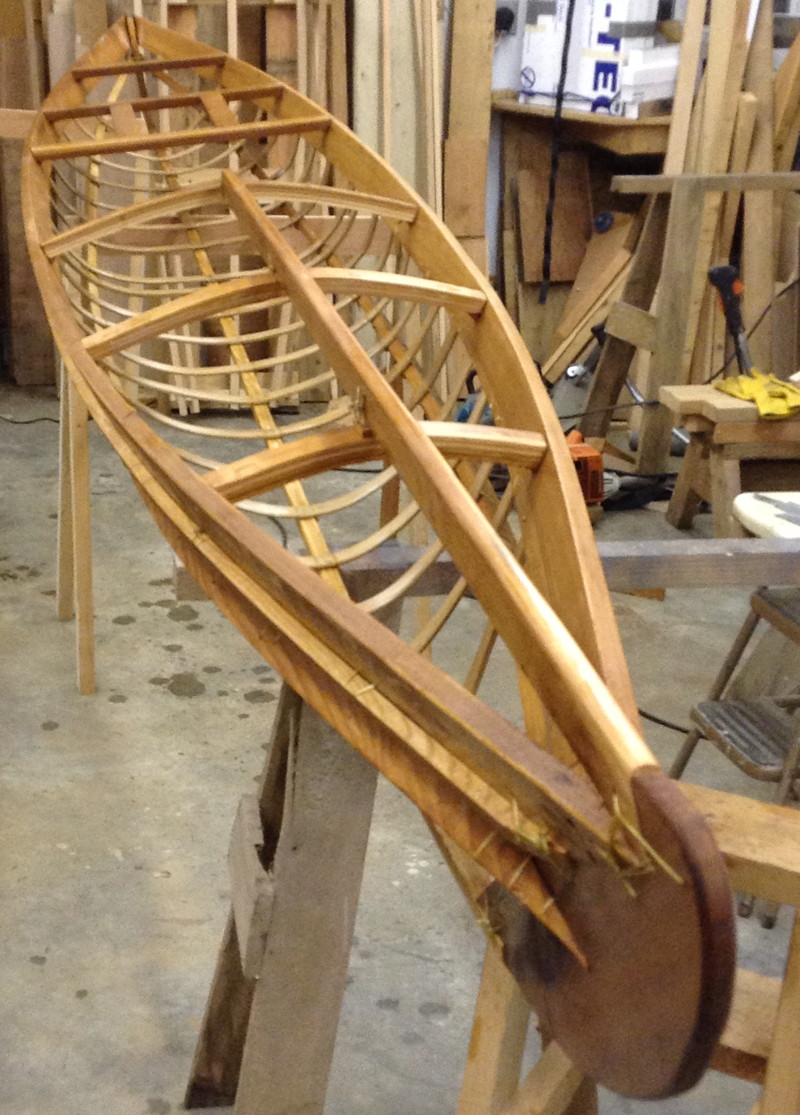
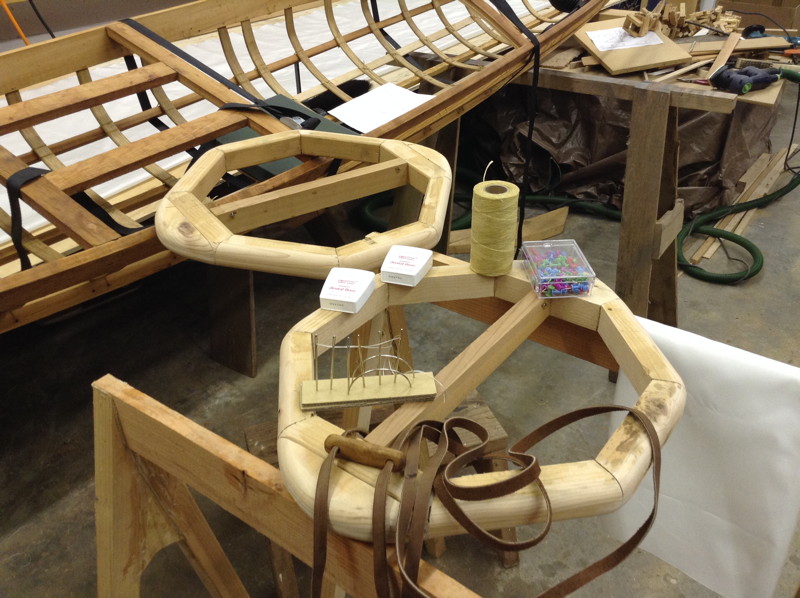
Lashings.
Here the knuckle strip had just been added. It's the strip between the top of gunwale and chine that runs back to just behind the coaming. The lashing are complete except for the coaming, which attaches on top of the skin. Tung oil mix has been applied and it's drying. Meanwhile, I'm started on making a traditional paddle, and varnishing the coaming.
Foot Braces.
I happened to have six bronze screws that were just the right size, so I copied the positioning from my strip built kayak and installed the new ones.
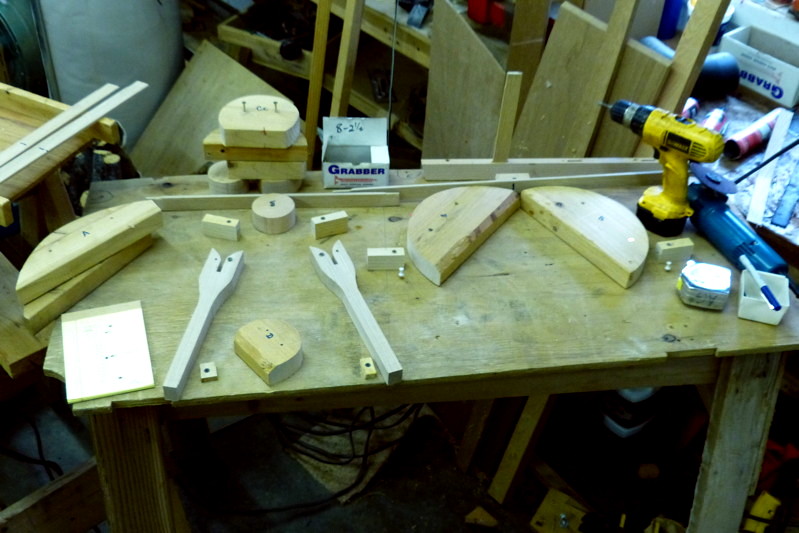
Making the paddle.
This was a fun project. I followed lines from on line drawings and built my first one from a piece of Red Cedar, 2 x 4 x 7 ft. This photo shows it to the right of the kayak frame.
Sewing on the skin.
I made a pair of hoops to practice my sewing since this will be my first effort in sewing nylon. I have enough excess 8# nylon to cover both hoops. Also shown are the rest of the materials I plan to use. I made up a pair of hoops to practice sewing with the excess nylon. Also bought leather for deck lines and made toggles.This is the bottom side of the first hoop. The end pockets were first made and one end partially sewn using whip stitch. The nylon is tight, but I've had trouble trimming it with the hot knife.
This shows my wandering cuts on the top edges.
This end is even worse and although I can pull the sides together some, I'll probably need a patch here. (I'm glad I decided to practice some first before doing the actual kayak.)
My practice coaming is sewn to the deck skin and otherwise the only points supported are forward and aft, just as the real coaming is supported in the kayak. I was curious to see how hard it would be to patch an area in the nylon. So, I cut out material for a patch and sewed it in without any wrinkles. It's possible to stretch nylon across gaps if they are not too big. There are limits however, as the gap on the far side shows.
I wanted to see how stiff the coaming would be supported by the nylon. It flexes quite a bit but no permanent stretch. The weight is 20 lbs and is totally supported by the nylon. I learned from this test not to cut the darts too near the tie holes as with this test, only about half the ties are carrying load. I tried making the zig-zag stitch with seine twine as the two dots on the front left show. I was barely able to stitch through with size #12 twine and also there is not enough room to stitch from the underside on this size model. More comments in log.
On the actual frame, I sewed the aft pocket first. The nylon was then slipped forward a few inches and the bow sewn. Then the skin was stretched enough to pull this end back on.
The bow pocket was pinned and stitched, the keel pinned and the whole thing rolled right side up. The next step is to make a cutting guide strip so I can make more precise cuts on the top.
I wired my cutting strip to the frame and it worked perfectly.After stitching my zig zag stitches, wrinkles appeared near the stern. Happily they pull out by pulling out the slack from the pocket seam. This was sewn with a running stitch so when I sew a whip sitch over it, all these wrinkles will disappear.
Wrinkles also appeared near the center, but I'm hoping those will flatten out when I finish the stitching.
See latest sewing photos.
Schulz gives some guidelines on this operation which I will attempt to follow.
9/26 - retrieved four 17 ft 1x4 cedar planks and a 12 ft cedar 2x10. Left probably from when I built my strip kayak. Milled out all the stringers and beams and ripped the forward beams into 3/16" laminations and epoxied into arches. The rear beams are flat. I finished laying out the curves to full size for each of the 21 ribs. These are normally steam bent but I discovered earlier that I can bend freshly cut cedar over a heat gun quite easily and I have an ample supply of small cedar trees and limbs on our property. 9/27 - Completed the epoxy work on the three beams and set up heat lamps to speed the cure along. Milled up the stems from the 2x10, and finished laying out the rib patterns. The longest rib will be only 27 1/2" so I can cut and mill those, running them through the planer when I am ready for them. I rigged up the planer and ran the stringers, gunwales and stems through and set up the gunwales with a centerline stick with the feet marked out. It's looking nice so far. 9/28 - Cleaned up the epoxied beams. Placed spreader sticks between the gunwales and cut bevels on the ends. Turned the gunwales to mark out the rib mortice locations so I can cut those on the router table before installing the beams. Took first photos. Discovered my smallest router bit is 7/16", I need 1/4". I also my smallest ring nails are 7/8" and I need 3/4". Need to source the leather straps and find out what weight cloth to order. 9/29 - Determined sources for all materials except the 3/8" strips of oil tanned latigo. emailed Schulz for source. Bought 1/4" router bit in Kingston and cut the mortices in the gunwales. Could not find 3/4" ring nails, but I have plenty of 7/8" ones, which I can cut down. Used hand planer and disk sander to true up my gunwale bevels. Need to determine the best artificial sinew to use for tying the frame parts together. Will have to trust skinboats.com but they suggest using their only artificial sinew for sewing thread. My next step on the frame is to start fitting and doweling the beams to the gunwales and tying so I need to get that ordered. Meanwhile, I can work on the coaming. I can also start work on a traditional paddle. My cedar 2x10 is enough for two paddles. 9/30 - Ordered all materials except the oil tanned latigo. Schulz wrote that he gets his from a tack shop. I warped coaming form with blocks and screws to put in 3/4" sag in center. Cut a piece of holly but found it impossible to bend with heat and I couldn't find a long enough piece without knots. Will try bending 1/2" cedar when I cut the ribs. Cut bevels on all the beams. They all fit well and gunwales are on the design lines. 10/1 - Fit the deck beams, and pinned to the gunwales with double 3/8" dia oak dowels. It's feeling solid now except in the coaming area where the gunwales bulge outward. I cut two ash stiffeners to go on each side of the coaming. That would give me something to attached the gunwales to and firm up the coaming. I emailed Schultz asking about adding the ash. I received notices that both my orders have been shipped. 10/2 - Schulz answered that there is no reason to support the coaming sides but that I should see an unfair flat spot in the center of the gunwales. I recut the middle aft beam longer and moved the far aft one further aft which produces the flat area and puts the gunwales closer to the H. Gordon lines. Pinned the aft beams and the two short deck longitudnals. Some thoughts for tomorrows work: I spent the last hour today in the shop cleaning up and arranging a bending station and I have the out feed table set up for the band saw, with the planer set next it so I can switch the feed end of the out feed tray from one support to the other easily. I still have to switch the dust collector hose from one to the other. After thinking about how I am going to join the two ends of the coaming, I decided to make the coaming in two layers. The top will have the lip nailed to it with bronze rib shank nails. (This is somewhat a Cape Falcon trademark I think.) The bottom has the skin sewn to the inside at about one stitch per inch, so the joining will be done whether it's two pieces or three. The bigger reason for this is that I am not sure I can even bend 1/2" cedar. Even if I use 1/2" on the lip, it still presents a problem where I join the two ends. The piece is also about 7 feet long and I'd much rather work with two 3 1/2 foot pieces and have two joints instead of one. One issue is how I will be able to handle the vertical bend in the coaming. It's only 3/4" in 31 inches, but I have to bend that on the 1 1/4" axis and I doubt very much if I can do that. So that gets me into making the strips 3/8" wider and trimming them down to fit. It seems that will be most easily done after I have the whole thing together and some temporary stitches in the stitch holes. That needs to be done before the lip goes on. The lip is only 1/2" so it should bend cold vertically with no problem. 10/3 - My Slidelock Foot Brace Kit arrived from NH today. The other good news today should have been that I had all the wood for ribs and coaming cut and planed to 1/4" and ready to rip to width, run over the jointer, heat bend and finish the ribs and coaming tomorrow. The bad news is that after dinner I picked cut rib strips from three different boards and was unable to bend any of them with heat. I presume my success before was from using a very young tree, only 2" dia, while today's tree was 8" dia and probably 30 years old. I even tried bending the layer of sap wood next to the bark and I couldn't even bend a 3/16" thickness of it. So, that's a two day setback for me at least. I don't know where Schulz gets his bamboo, but I don't see it for sale anywhere. Edensaw does list bending oak, so I'll see if I can get some tomorrow and start over. 10/4 - Bought 10 bf of bending oak from Edendsaw, a hot plate, kettle and enough foam to build a steam box. Made the box and tried bending a trial piece of 3/8" oak after it had been in the steam box for 20 minutes with temp maxing out at 191 F. It did bend but not enough and it was starting to break on the outer edges. It could not fit back into the steam box without unbending it, so I quit for the day. 10/5 - The hot plate had a puddle of water in it when I removed the pot. Attached a hose clamp around the pipe to the pot spout and wrapped a large rag over the whole joint. Cut 2" walls and ends for the steam box from yesterday's scrap, so my box is now 2" high inside. I milled up two 3/8" x 1 1/4" x 43" strips (two 43" strips allow for 4" overlap on each side of coaming) and placed in box with heat on high. Box temp came up to 201 F in 15 minutes. After 20 min soak at 205 F to 210 F I was able to easily bend and clamp the piece around the aft end (easy end) of the coaming form. After several hours I moved the clamped piece off the form and repeated for the forward end. The radius was much tighter and came out a little lopsided. It may just give the coaming some character. Started cutting ribs. 10/6 - I was in Edmonds most of the day so no work. I did clamp the two ends of the coaming together and the width came out perfect. I'll lap join the two pieces and cover the angle with the lip so it won't show. The things I ordered a week ago arrived today. I weighed the piece I cut off the end of one of the coaming pieces and dried it in the oven overnight and determined moisture in the bending wood at 20 percent. That apparently is okay for white bending oak. It's sure pretty wood and very hard and strong.
10/7 - Made up bending jigs and after a few false starts, I figured it all out and steamed the first two ribs. Since one was the shortest rib and the other was the longest one and they both came out perfectly, I am pleased. 10/8 - I steam bent two lip pieces around the coaming mold and made the lap joints on the two main coaming pieces. I had intended to join the lap joint with sinew, but I was unable to get enough tension in the sinew to keep the joint from moving excessively. I don't have the skills to use sinew to make a firm joint so I made an epoxy scarf joint test from cut off pieces of the same piece of oak I made the coaming pieces from. 10/9 - A uTube video showed me why my knots in the sinew didn't hold. My neighbor Bob gave me a sheet of 1" purple foam he had left from one of his projects and I built a smaller steam box from it. I'm hoping the smaller box will heat faster and once I know how fast, I want to try adding salt to see if that reduces the time further by reaching higher boiling temperatures. 10/10 - The epoxy test held as well as a solid piece under load, so I cut out the lap joint cuts and replaced them with scarf cuts. I also cut two new pieces to scarf in where the lap joints were. My concern is in using epoxy in a joint that is under load. The required clamping could well push all the epoxy out of the joint. 10/11 - Epoxied the coaming scarfs. 10/12 - Cleaned up the scarf joints, sanded the coaming and tried to fit the lip. While the aft half of the lip fits fine, the curve of the fore section was too sharp a bend to fit. So I cut a new lip piece and steamed it. This time I was able clamp directly to the coaming, so it's a perfect fit now. 10/13 - Nailed the lip on the coaming. The wood was so hard and the bronze so soft three nails bent over. Tried out the purple steam box redoing ribs 3 and 14. The foam warped much more than the styrofoam, so much I had to pry the door open with a large screw driver. The ribs bent easily, but I didn't get the right bends. I cut 9" off each end of the styrofoam box and was able to fit the same ribs into it. So I set up a jig which should correct the bends and I hope to make them fit tomorrow. 10/14 - I discovered that I could salvage the ribs that didn't fit right on the first try. When I put the bent test rib in, it pushed the end block out only minutes after the steam developed in the box and the rib straightened out. This will save me a lot of material compared to only using what came from the first steam attempts. I created a fitting board to test the fit of pieces as they come out of the box and are first shaped. This should allow me to make quick comparisons to other ribs so I can maintain a work flow. 10/17 - rebuilt the spout on the steamer and tested by bringing the box up to temp as measured with my new thermometer. 10/18 - Cut individual fitting boards and was able to steam a batch of six ribs with no trouble, and I know they will fit the gunwale mortices now. I want to add ribs at both ends so I devised guide blocks attached to the router base. It worked perfectly but I centered it on the base and the collet is off center about 1/8" so I'll have to do it over. 10/19 - I marked up the jig board for the remaining ribs. This lets me screw in the blocks just following the numbers on the board so it's very fast. Corrected the router blocks and cut the remaining mortices. 10//20 - Steamed the remaining 7 ribs. I made a new tool from plywood that has a slot for the ribs so I can bend and twist the ends to fit into the slots in the fitting boards. Otherwise the stress seemed too much for the soft cedar mortices on the end ribs where the mortice angles are larger. 10/23 - Placed the keelson on top of the ribs. Several ribs were within 1/4" or so, all high and few if any it appeared could be made to fit by just trimming off the ends. Tried to figure out the flaw in my first approach and made several tries with no success. Finally decided to try cutting molds to hold mock stringers and re-steaming the ribs to bending inside the stringers using the conventional method of bending ribs. 10/24 - Blew up the H. Golden lines sections to full size on the printer. Rearranged the shop to have clear space to try new rib bending process. Milled jig stringers from fir, replaced end blocks in the steam box, and set up strong back rails on heavy sawhorses. 10/25 - Made and installed bending frames at the even feet from 2 to 12 feet and placed the heavier fir stringers. I pulled the the ribs that fit best from the gunwales to see how they fit in the rib bending jig and I'm satisfied. The jig seems strong enough without added bracing, but I'll have to bend some to be sure. 10/26 - Re-steamed all the ribs and they are all on correct lines now and I know exactly how much to trim off them before inserting them back into the gunwale slots. 10/27 - Correct lines don't mean correct leg fits however. Although I had perfect bends in all the ribs at the stringers, none of the leg angles were right and the amount of correction was too great for anything but resteaming. I was flabbergasted that this could happen and only after figuring the trigonometry did I realize that while H. Golden's drawing reflected the 1/2" square knuckle, it was not included in the section drawings I had copied my jig angles from. (I later discovered Golden was correct and it was my own mistake. - 11/1 below) I thought it would be simpler to cut off a wedge on the outside of each leg and epoxy it on to the inside to fix the fit. Tried that with ribs 20 and 21 and found that didn't work because the legs were not long enough. On further study of the drawing, I realized I could just add a 15 degree wedge behind each of the top stringers rather than having to disassemble. It appears that many of the ribs will now be too short. 10/28 - I steamed four ribs, three of them new ones, and got them clamped with the right leg angles I think. I'm going to check these first before steaming any more. 10/29 - Yesterday's ribs fit fine. Replaced side walls on steam box and patched with duct tape. One of the remaining 16 ribs fit okay so I re-steam bent the other 15 and it seemed to go well. 10/30 - The ribs fit better but still tight due to the undersized router bit I bought. But, I found a Dremel Tool bit, slightly smaller than 1/4" and tapered, does a wonderful job of trimming the high spots. 10/31 - Finished fitting the ribs and locked them in with bamboo skewers as dowels. I cut a new keel as I found a better piece of cedar. sanded down the keel and chine stringers and clamped them on the ribs. They seem to fit beautifully. 11/1 - I discovered my biggest mistake yet! I knew originally that the gunwale angle was 25 degrees off vertical but in setting the first angle I accidentally added 5 degrees to the 70 degree mark instead of subtracting it. After that, 15 degrees just looked right to me. The Golden drawing is correct, and my ribs should have fit right the first time. The flare angle totally controls the rocker in this design, so it had to be right if I ever expected the kayak to turn in the water as it's supposed to. I was able to extract my dowels and recut the beam angles with the ribs and clamped on stringers holding everything in place. 11/2 - Even with the beam end angles recut to 25 degrees, and the dowels only inserted lightly, the best I could get was 20 degrees from the gunwales. Starting with the tightest rib I had to remove 8 of them before achieving 25 degrees on both gunwales. Clamping the joints, I began installing diagonal dowels to lock in the angle. 11/3 - Finished the diagonal doweling. I can see the increase in rocker the correct flare produces. After re-pinned the ribs however, some of the angle was reduced. So, I started again with the tightest ribs and adjusted the mortices to loosen up the fit on those ribs, bringing the frame back to the 4 1/4" rocker indicated on Golden's shear line. 11/8 - Recut stern gunwales with correct flare to stem fit. 11/9 - Recut bow gunwales to stem fit. 11/10 - Attached stems to gunwales temporarily with screws. I'll replace those with dowels once I fit the keel to the stems from the bottom. 11/12 - Put radiuses on the gunwales with a Slickplane and sand paper. It's quicker and less messy than using the router. Tried to lash the top stringer to the forward beams, but was unable to master the technique in getting the lashing tight. I finally just gave up. 11/14 - After two attempts using tarred marlin, I made a good enough lashing on the top stringer. I tried the technique I used with marlin using double sinew, and the results appear passable. 11/15 - Built a jig to test my sinew joints against an epoxy one for comparison plus variations in the sinew joints. Cut a new rear stem, and moved the second from aft rib in the coaming forward 3". 11/16 - Epoxy joint supported 124 pound inches of moment before breaking out part of cedar where epoxy had penetrated. Double strand sinew joint held 59 lb in, before compressing wood and stretching sinew. Joint returned 90% when load removed. Wood compression was permanent. See no advantage in more than double strand. 11/17 - Completed 15 sinew joints on the keel, 7 more to go. 11/18 & 19 - Completed lashing the keel and the first chine. 11/20 & 21 - Realigned the chines and stems. Lashed the aft stem and gunwales. Cut the knuckles. 11/22-24 - Lashed the other chine and knuckles, coated with 2 coats of tung oil mix, and 2 coats of varnish on the coaming. Installed the foot braces. Printed out the drawing for the paddle and measured out my 2 x 8 cedar board. It's 7' - 6" long, or enough for two paddles. 11/25 - The shop cools to mid 50s at night so the varnish doesn't dry overnight. Measured off and made the first four cuts on my first Greenland paddle. 11/28 - Finished the paddle and coated it with tung oil mix. I've studied Schulz's method for skinning the kayak and theoretically all I need now are more push pins. I'm not really sure I'm ready however, so the engineer in me it toying with the idea of constructing a test frame and coaming and using the excess skin and poly coating, and have a trial run with that first. 12/2 - Tried sitting in frame on floor. Needs slats between ribs for my heels. 12/4 - Milled two 60" slats. Tested sinew single knots. 12/8 - Lashed the slats and sat on foam cushion. The seating seems fine, but 1 1/2" of the toes on my size 13 shoes would stick through the upper skin. The skin is below the slat, so it means I either wear socks, or make small domes in the skin for my toes. 12/9 - Placed ply where skin will go on deck over feet and assumed paddling position. It's a tight fit getting in but my calves and hamstrings felt fine after 20 minutes with pressure on the pegs. ----- 2015 ----- (Spent Christmas in California) 1/16 - Made up test hoops for practicing sewing. Also bought leather straps for deck lines. The dental floss I bought was too thin and I don't want to use waxed, so still looking for that. 1/17 - I purchased thicker dental floss, made up toggles for the deck lines and cut radiuses on the hoops. I still need to locate seine twine to sew zig zags and coaming. 1/22 - Made my first attempt at sewing. Luckily I started sewing on practice hoops to get the hang of it. The callouses on my fingers kept catching on the floss, like tiny fish hooks. I was forced to stop and carefully smooth off the rough places on my fingers with 220 grit sandpaper before being able to continue. After sewing in the end pockets and making a whip stitch on most of one end, I tried to do the zig-zag stitch. I was unable to find #9 seine twine locally so bought #12, thinking it was smaller. (it's larger) I could barely get it through the eye of the curved needle, only to then find there was no way I could stitch inside the nylon, it was too tight on the hoop. Removing it left black, ugly tar spots on the nylon. I glued up a smaller practice coaming to sew in the middle of one hoop once I finish whip stitching the rest of the seams on the hoop. 1/23 - From sewing on the hoop I've learned how much I can stretch the nylon just with the stitching, that I must wait until the pockets are completely sewn before trimming the middle parts, that if I do trim too much it can be patched back in, but it's ugly. Sewed in the practice coaming. When I cut the darts for the part of the nylon that folds up inside the coaming, I forgot to stagger them with the twine holes, so only about half of them do much as a result. Other things learned; 1) Use push pins to hold fabric while using running stitch on end pockets, then trim. 2) Don't cut with cedar or fir under the nylon as a brown color bleeds into it. 3) Use something to hold nylon in place on one side while trimming excess. (push pins should work since I don't have small enough twine for zig-zags) 4) Insure that the twine holes in the cockpit are an even number so each of the two passes can be tied on the outside. 1/30 - Sewed the aft pocket and pinned the bow. 1/31 - Sewed the bow pocket, slipped the aft pocket over the aft stem and rolled the kayak right side up. 2/5 - Grooved a piece of ash for a cutting guide, wired it to the frame and trimmed the two sides. 2/6 - There were excessive wrinkles on the top side center due to lack of grip in my hands. (arthritis is a new thing to me, but at 78 years, I guess it's not uncommon.) So, I rigged up my come-a-long with shoes to connect a rope to and to sew to the end pockets. It worked great and I expect now the remaining wrinkles will flatten out when I finish the top seam. 2/7 - Repaired aft pocket which was slipping off the frame. By clamping the now excess nylon on the ends, I ran a running stitch to finish the pocket. Did the same with the bow, removed the shoes and turned the hull over to trim the ends and whip stitch over the running stitches.