How I happened to build a kayak.
In Mid January, 2001 I went through a decision process of what boat to bring on a trip planned with three good friends to tour the Bowron Lakes canoe circuit in September. This is a popular wilderness trip of some 70 miles, through eleven lakes and several portages in British Columbia, Canada. My companions were all building or planning to build kayaks, and were all planning to bring separate boats on the trip. I had not much experience kayaking, and had never owned one, except an inflatable so the search for a plan ensued. I was very fond of one particular commercial design that I had paddled, and discussed it with it's designer. He refered me to a magazine review on the internet, which displayed the lines and suggested that for strip building a single kayak, I could copy from those.
Building Techniques. I had several books on strip building and had strip built two other hulls, so I had enough experience in strip building and I had lofted several boats, so I felt comfortable proceeding without plans. On this project I used bead and cove construction where all the planks fit inside each other, making all the joints flush, which is a pleasure compared to having to butt and bevel the joints, which I had always done before. I started stripping on February 14th and launched March 17, 2001.. Unconventional Techniques. While I generally followed the conventional techniques used by most kayak strip builders, I experimented with other methods in my construction, most of which I felt worked better for me. The following are some which I especially liked and offer to other builders.
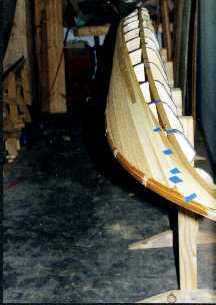
* I used a 3" square internal box beam, with 1/2" walls, which I found light and stable, even with the molds supported on side as shown in the picture. The first advantage of the box is in squaring up the molds. My molds were each built from four pieces of scrap 1" fir lumber, glued into a square with an open center. By planing the top surface of the box beam level and flat, and the lining up the molds with the top edge of the holes, the mold alignment went quite smoothly and accurate. The bonus was in being able to support the molds side up as shown in the photo.
* I ran all edges of the molds over a 1/4" radius roundover bit in the router. The rounded edges were set towards the ends from the widest station, set in 1/4". This allowed a good surface to staple into without creating stress in the joint and the 9/16" staples held quite well.
* I don't use glue in the joints, but roll on a layer of "Clear Coat" after all the stapling is done. This is a penetrating epoxy and it holds all the strips together for sanding. After the glass is on the outside, the first fill coat under the inside glass layer fills in any voids in the joints. This has the advantages of being much faster and there are no glue marks in the final finishing.
* I started with a double cove strip on the keel and ended with a double bead strip in the center of the deck. I ran strips full length from the bow to stern at the keel, sheer, chine and down the center of the hollow at the skeg. These strips have little twist, so the remaining strips fill from these base strips toward the keel. This means that all fitting is done cutting beads to fit into coves already in place. By setting up my router table as a jointer, it was quite simple to mark and form each strip. The only hand fitting I had to use was on the skeg where some sharp angles were involved and I had to bevel fit the strips to each other by using a pull saw in the joints.
* I used a bead and cove deck/hull joint. I taped the bead at the sheer on the deck, so it would not become epoxied to the hull. I found that having the bead and cove was quite beneficial when later joining the deck to the hull and it presented no problems.
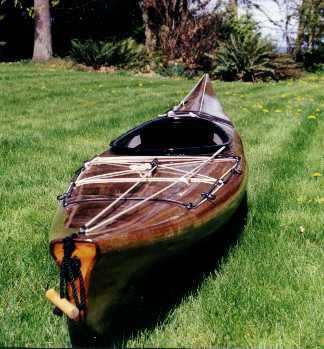
* I used two layers of 3.25 oz satin cloth, which is stiffer than standard weave. It is more difficult to get to lay down properly, so I ended up using at least as much epoxy as I would have with standard weave. With practice, I think the satin would weigh less. As it is, the finished kayak weighs 50 lbs. This is still 8 lbs less than the commercial glass version. The kevlar version weighs less than mine. I do believe the glass version is stronger, although my version seems stiffer.
* I drilled holes for all the deck hardware before joining the deck and hull. This allowed me to position backing plates which were reinforced with glass on both sides and an over sized hole with epoxy and glass in the center. These were later drilled and tapped to receive machine screws for all the cleats, eye straps and the hatch coaming.

Lessons Learned. There are always things learned in a project like this, things I'd do differently the next time. I cut my fiberglass on the bias, which is recommended in the "how-to" book I have. I had problems with wrinkles in using satin cloth, which would have been easier to control had I cut it with the weave. I bought a roll of 2" wide, 9oz glass tape which I used for my seams and the inside of the lip on the coaming. The wrinkles were impossible to get rid of and I have white spots where the weave would not wet out. For the main part of the coaming, I used 7.5oz standard weave strips, cut on a bias and that worked fine. I used glass strapping tape to hold the deck and hull together while fiberglassing the inside seam. This worked well except that the tape was an off brand and quite old and I could not remove the adhesive from the epoxy surface. A commercial adhesive remover wouldn't touch it. I finally got most of it off with paint thinner, most of that off with alcohol, and finally had to resort to using Interlux 202. This stuff is so strong it dissolves vinyl gloves, but it removed the stickiness and I was able to sand the final residue off.
Return to Index