Hard Drive Replacement
July 7, 2011
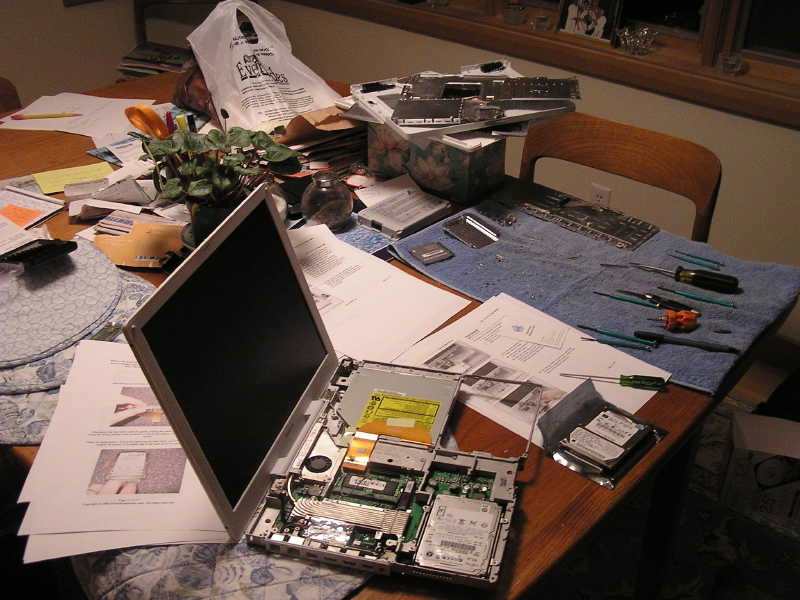
When the hard drive went out on Annamarie's old iBook that we now use as a travel computer, I knew that I wanted to dig inside it and see if I could replace the drive and actually get it back together and running again. This photo pretty much shows it all. I went on line and found four different descriptions with photos on how to do it. Each were intriguingly different so I printed out pages of what looked like the most pertinent parts, and started in. Not far into the process, I realized that what I had before me was different than any of the iBooks illustrated, so I was on my own. If I had known that to begin with, it would have helped. The common element of all these iBooks is that the hard drive is located under the upper shield, below the power supply and logic board. To get to it the shield has to come off. That requires the upper case to come off, which requires the lower case and lower shield to both come off since the upper case is screwed in from below. The lower case snaps off from the upper case by flexing the sides of the battery compartment to get some slack to get started. There are over 40 screws of different four kinds in various lengths and it's essential to get these back into the same holes, so I ended up making sketches of both cases (top and bottom for the upper case) and both shields with the screws numbered on the sheet and laid them out on a towel in exact order. The trickiest part is taking off the upper case once all the screws are out. There are four connectors that must be carefully unplugged in the process or they can be damaged. First is the keyboard cable, located under the RAM shield, under the airport card, which also needs to be unplugged from its antenna and from the logic board. Then the track pad must be unplugged from under near the center of the case. After that, the case can be rotated up to unplug the power switch cable, and speaker wires. Getting these unplugged is easier than getting them back. The hard drive is shock mounted and also has a cable with connector which is quite delicate. Other than touching the metal parts before touching the electronic components to avoid static damage to the parts, the rest is just common sense and proceeding with care.
I had not sketched out the screws that go into the upper case and had some how remembered that they were long screws when I got to that point in reassembly and I had two long ones left over that had somehow not gotten used at that point. I knew that something was wrong when they bottomed out before becoming snug at the top. I had a sick feeling when I turned the board over and realized that I had screwed them right into the top of the logic board in a place loaded with components. Hoping that I had missed everything critical, I set the screws aside and moved on. In trying to power up the unit once all assembled, nothing happened. I checked the battery and saw that it was very low on charge while I was sure it should have been nearly fully charged. I was tired at this point, being five hours into this process, and not thinking my best. I proceeded to take it apart, returned the new drive back to it's box for return to Fry's Electronics, where we had purchased it the day before, and reinstalled the old drive and put it all back together. When I explained this to Annamarie after she got home, she asked if I had tried connecting it to the power cord. I figured I had little to loose at this point since the new drive was safely in it's box so I did and it started trying to boot up. I fed in the install DVD and it booted up on it and responded to keyboard and trackpad and made all it's normal sounds. That indicated that there was a very good chance that I had not damaged it. So, the whole process got repeated a third time and the new drive installed for a second time.
I was unable to get the install DVD to reformat the drive so that it could install Mac OS X. On line, using the other computer, I ran across several posts from others that had the same problem. One suggested that the "normal" process was to install the drive in a drive case and reformat it from another computer. Yeah, sure. Another suggested holding down the "alt" and "option" keys while booting up the install DVD. Those are the same key on all the iBooks I've seen but I tried it and it worked. Once I had the system on, I wanted to upgrade the software since it was five years old. It could find our airport, but would not accept the password using the set up software or the network software from the preferences files. After trying everything else, Annamarie suggested I try to turn airport off and back on from the menu bar. Amazingly, that resulted in a prompt for the password and it accepted it right off, and we were home free. Well, nearly free compared to what it would have cost to have paid someone to do it. It's now working perfectly, and loads web pages at around four times faster than it did before. I am not sure why the difference is that good. We had a little over 6 GB on the 40 GB old drive so it was not over loaded, and we had 1.25 GB of memory before. So, it must come from the higher RPM of the new drive and its 8 MB cache.
Anyway, it was a fun project and the iBook is better than new now and we have a "beater" laptop to again take on trips that now has more respectable web capabilities.